-
1. Theme Requirements
- Introduction
- Theme Requirements
- Video Tutorial for Installing Theme
- Theme Installation via WordPress
-
2. Theme Customize
- General
- Header
- Page Title & Breadcrumb
- Typography
- Layout & Styles
- Footer
-
3. Blog Post
- Blog archive
- Blog Single
- Team Archive
- Team Single
- Services Archive
- Services Single
- Case Study Archive
- Case Study Single
-
4. Post Type
- Services
- Team
- Case Study
-
5. Themesflat Addons
- TF Title Section
- TF Button
- TF Partner
- TF Services
- TF Step
- TF Case Study
Theme Requirements
First of all, Themes Flat thank you for choosing to buy our theme!
To use Saylo, you must be running WordPress 5.x or higher, PHP 7.4 or higher, and MySQL 5 or higher.
1.Introduction
In this document, we provide all kinds of good information with all the details you need to use our theme. It is recommended you read it thoroughly to fully leverage the Saylo theme’s capabilities. Please also make sure to check out our Video Tutorials as they explain everything covered in here in greater depth. We hope you have fun and enjoy working with our theme!
Theme version: 1.0.0
Created date: Jan 09, 2025
Update date: Jan 09, 2025
Author: Themesflat
If you have any question contact us by
Email: helpdeskthemesflat@gmail.com
Skype id: helpdeskthemesflat
Create ticket id : https://themesflat.ticksy.com/ticket
2. Requirements
- PHP 8.0 or higher
Required must have
- upload_max_filesize = 128M
- post_max_size = 164M
- max_execution_time = 300
- max_input_time = 300
- memory_limit = 256M
Besides, need more
- Elementor
- Contact Form 7
- Wiatech Addons
- Themesflat Addons For Elementor
- Slider Revolution
- One Click Demo Import
- MC4WP: Mailchimp for WordPress
3. Recommended PHP Configuration Limits
Many issues that you may run into such as: white screen,400 error, 500 error, demo content fails when importing, empty page content and other similar issues are all related to low PHP configuration limits. The solution is to increase the PHP limits. You can do this on your own using cpanel, or contact your web host and ask them to increase those limits to a minimum as follows:
Allow Url Fopen (allow_url_fopen) – ON cURL library** – your server must work with curl or url_fopen. OpenSSL must be enabled.
- PHP memory_limit = 256M
- PHP max_execution_time = 300
- PHP Post_max_size = 54M
- PHP upload_max_filesize = 128M
4. Recommended PHP Configuration Limits
After purchase and download we have file themeforest-20396082-themename.zip Continue we need Extract Files i have 3 files:
- 1.theme
- 2.theme-child
- 3.documentation
Please, follow the steps below to install Theme.
Watch the video One Click Install Demo
5. Recommended PHP Configuration Limits
This is probably the simplest way for most users. Here are steps you need to take:
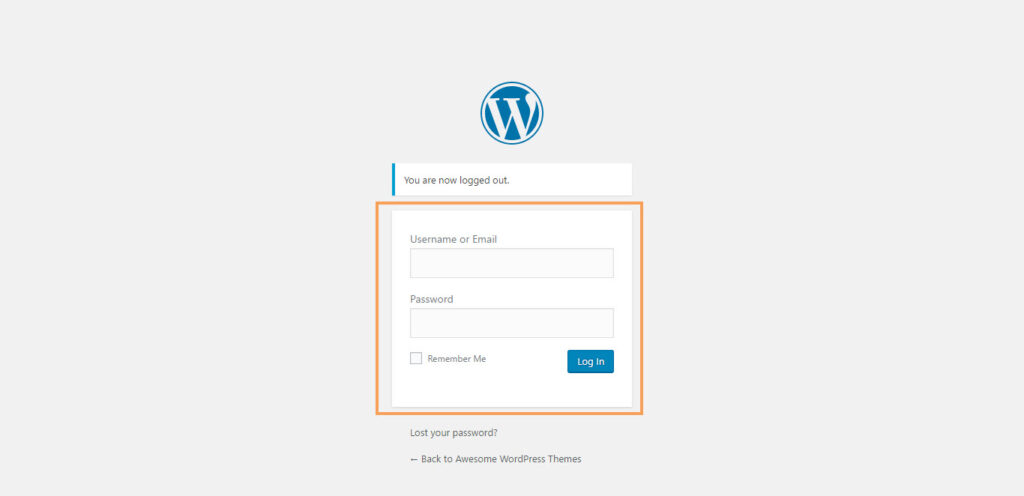
- Step 1 – Login to your WordPress Dashboard.
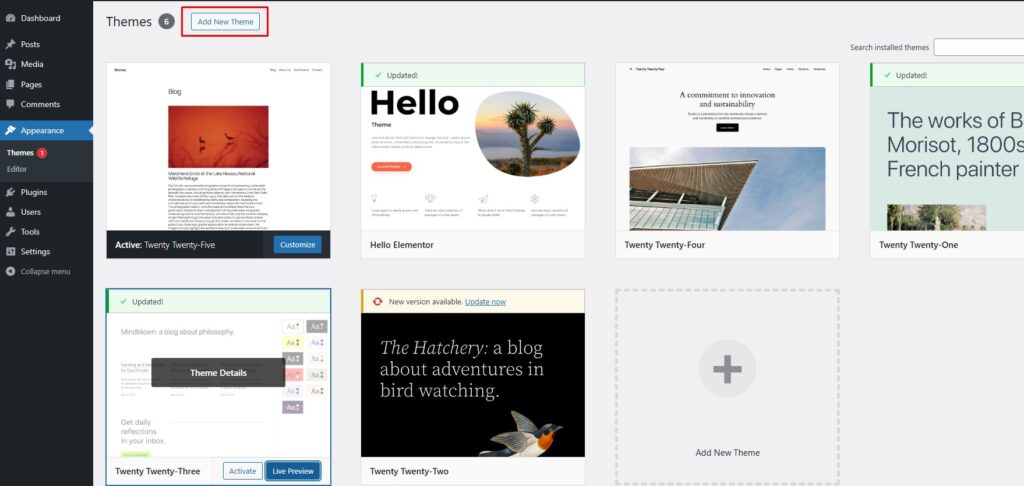
- Step 2 – Go to Appearance > Themes. And then click Add new button, located at the top of the screen or Add new theme (see screenshots below).
- Step 3 – Click on Upload button at the top of the screen.
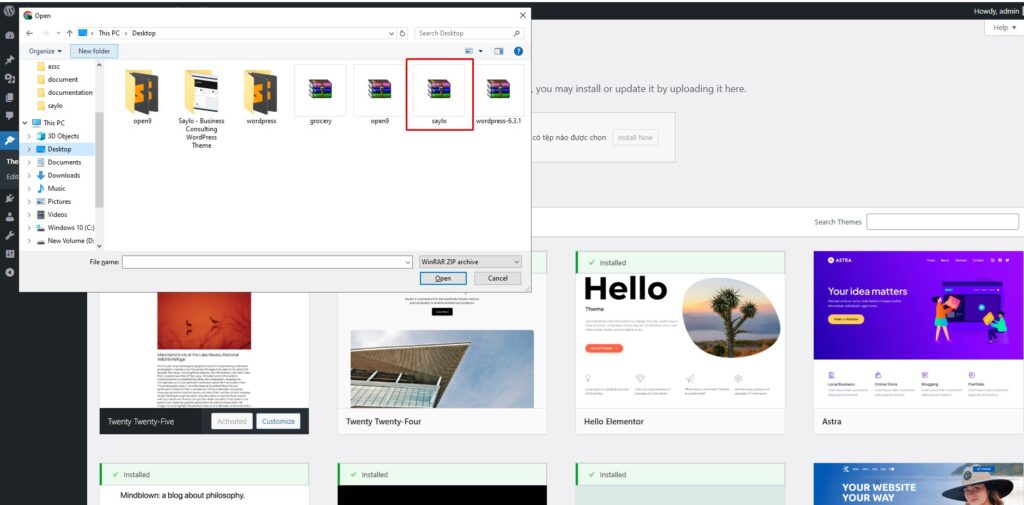
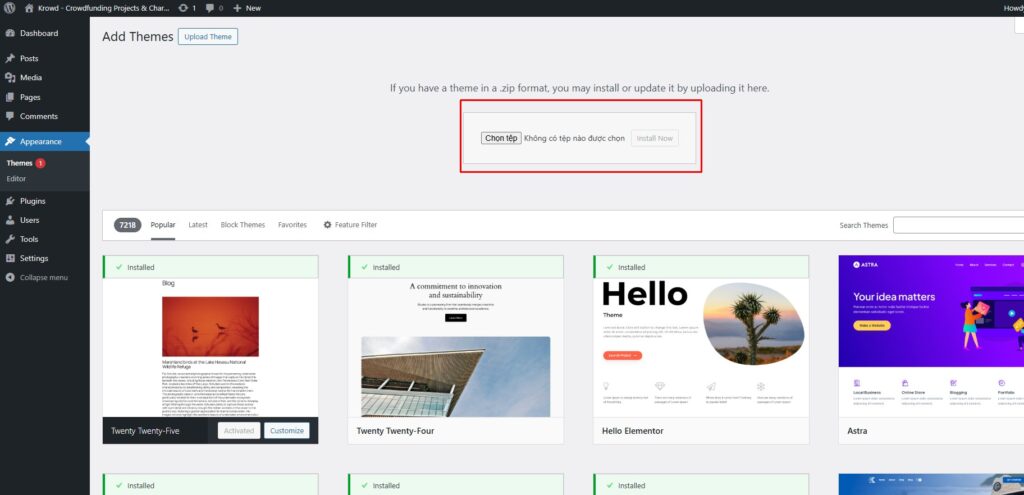
- Step 4 – Next, Click Choose File button to browse themename.zip file in locate.
- Step 5 – Click Install button and wait a moment.
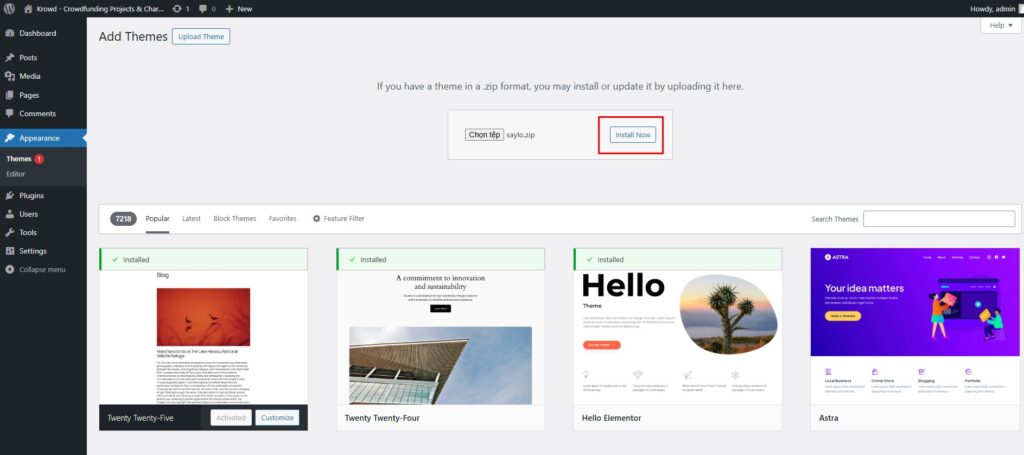
Note: After installing the Main theme, if you want user more child Child theme. Then please continue install child-theme the with the same installation above
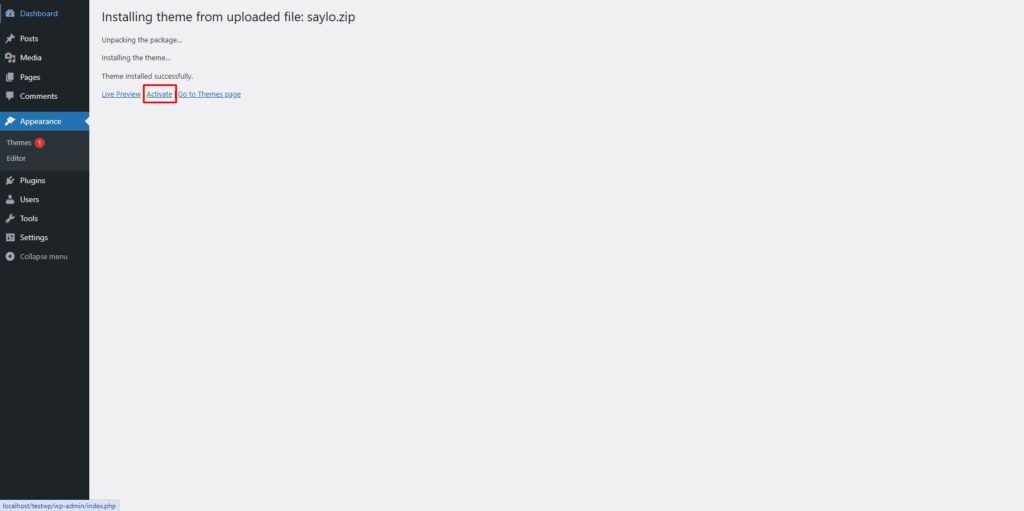
- Step 6 – After done installing, click Activate to publish the theme.
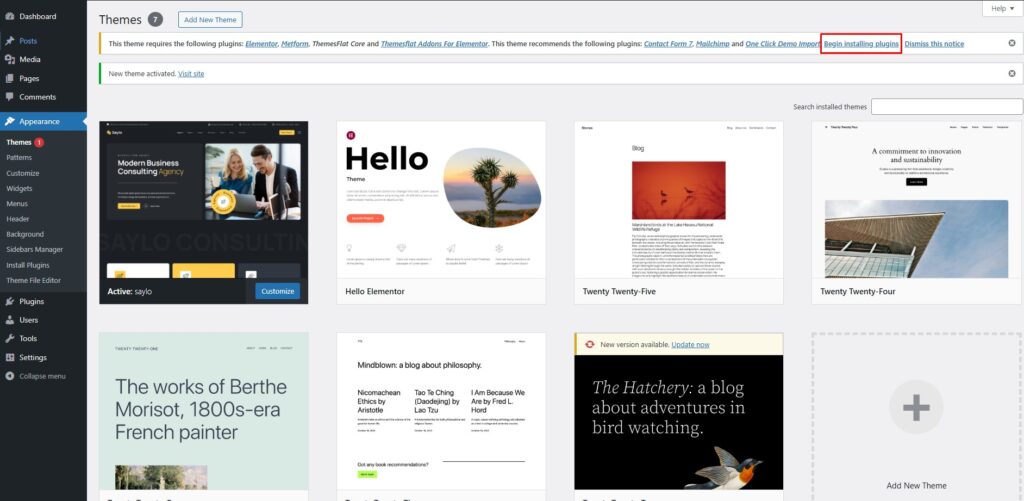
- Step 7 – After activating the theme a notice should appear on the top of the screen, click on link Begin installing plugins ( See screenshots below ).
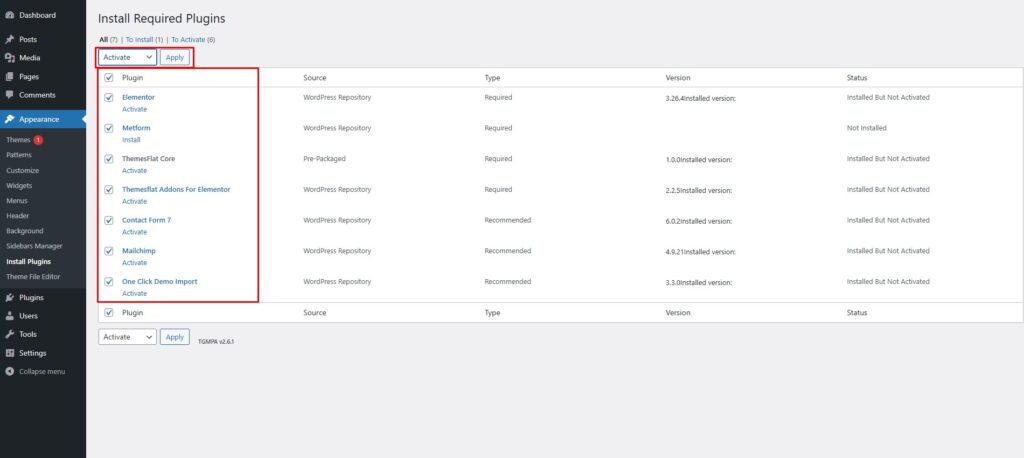
- Step 8 – After install plugins, go to Dashboard > Appearance > Install Plugins, check all the plugins you want to activate require for this theme
The theme requires the following plugin: Contact Form 7, Elementor, ThemesFlat Core, Themesflat Addons For Elementor, Mailchimp and recommends the following plugins: One Click Demo Import
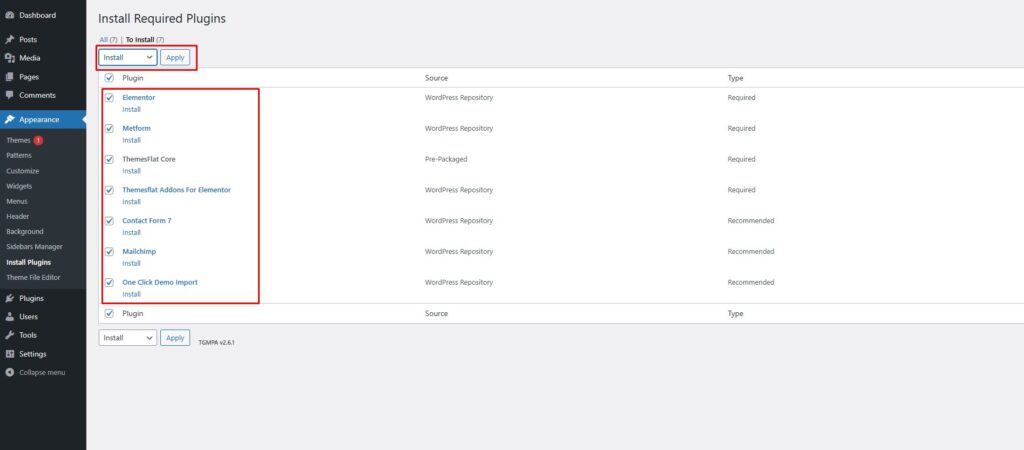
And active plugins
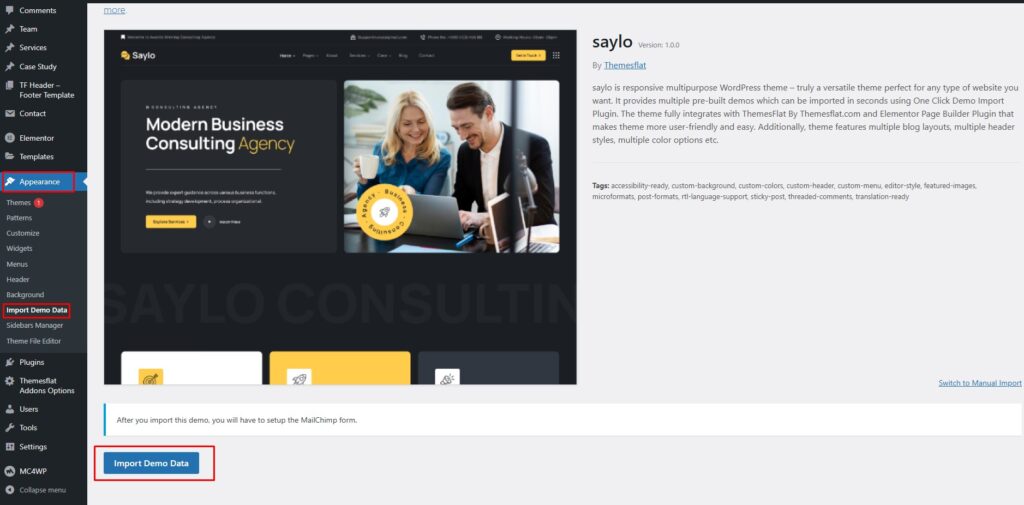
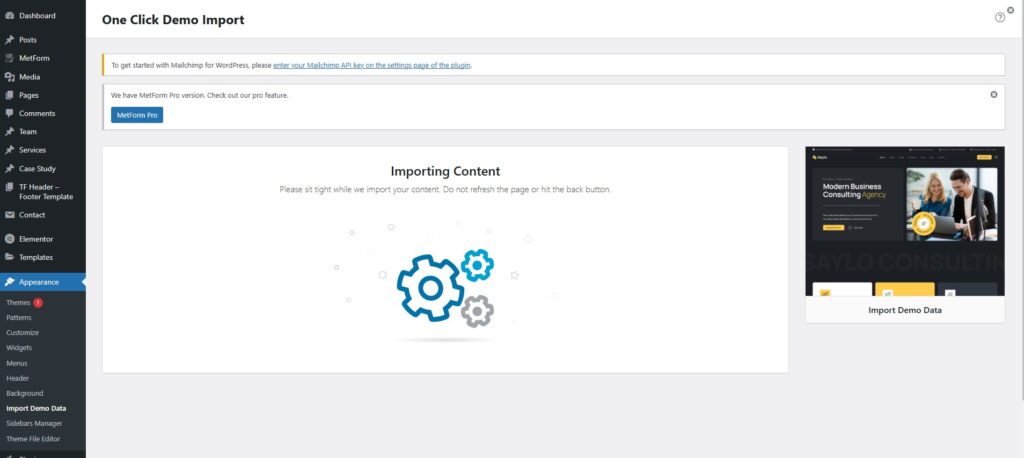
- Step 9 – Go to Appearance > Import Demo Data
Go to Continue & Import
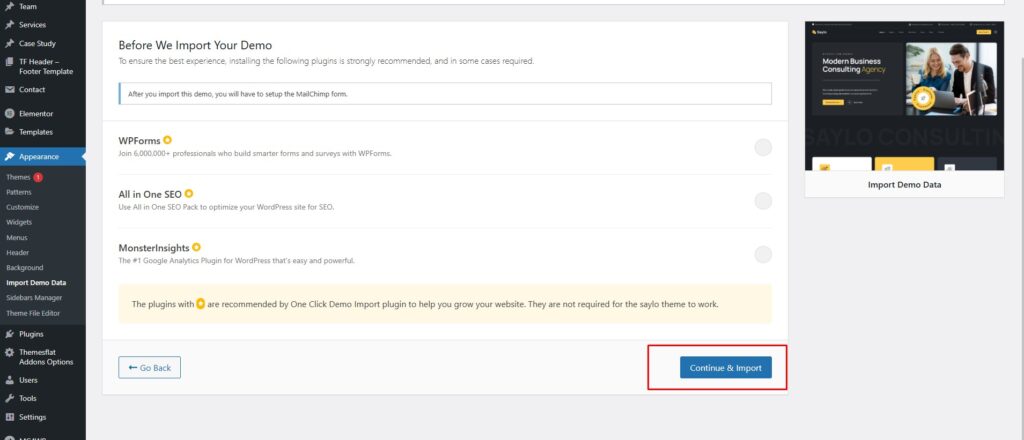
And Wait
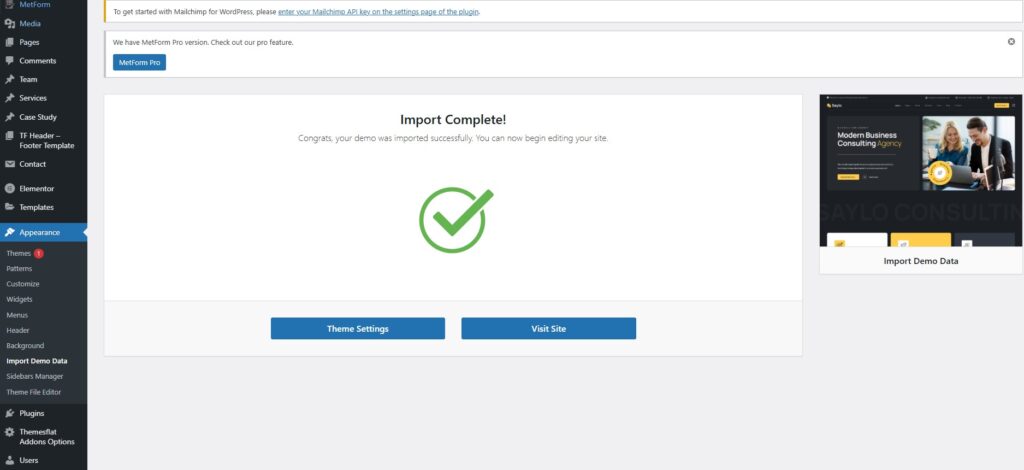
Finish
Install through FTP upload
If you want to install via FTP, here are 3 steps you need to take:
Using FTP client, login to the server where your WordPress website is hosted
Using FTP client, navigate to the /wp-content/themes/ directory under your WordPress website’s root directory
Using FTP client, upload the Saylo directory to themes directory on remote servers
Once installation is complete, your Saylo theme will be ready to use.
Theme Customize
To start customizing Theme, in the Admin page please go to Dashboard > Appearance > Customize
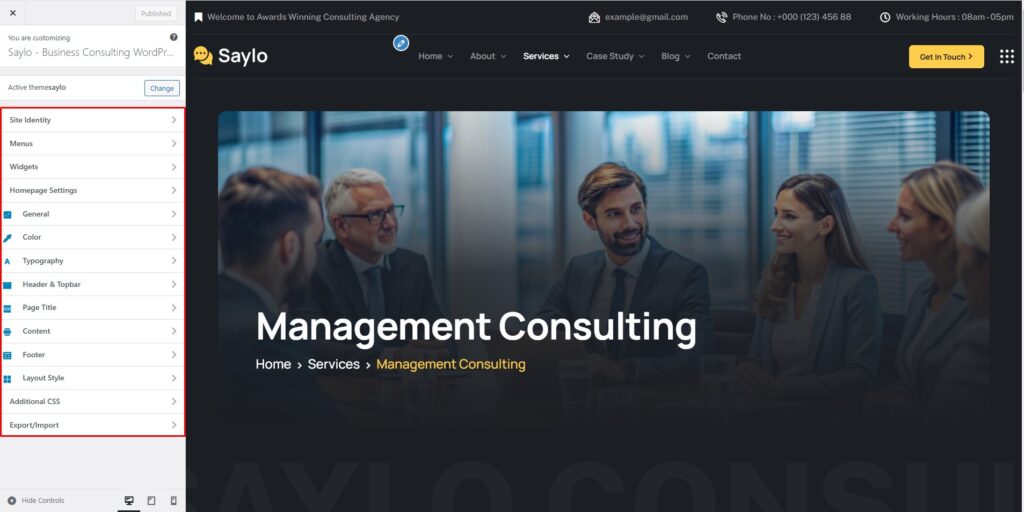
Note: Please remember to click Save & Publish button after done customizing to save the changes
These are global settings so its effect is site-wide. These settings can be overridden in single post or page
1.General
- Site Information
- To Customize Theme you go to: Dashboarb -> Appearance -> Customize -> Site Identity Site Title: You can setup and change your site title
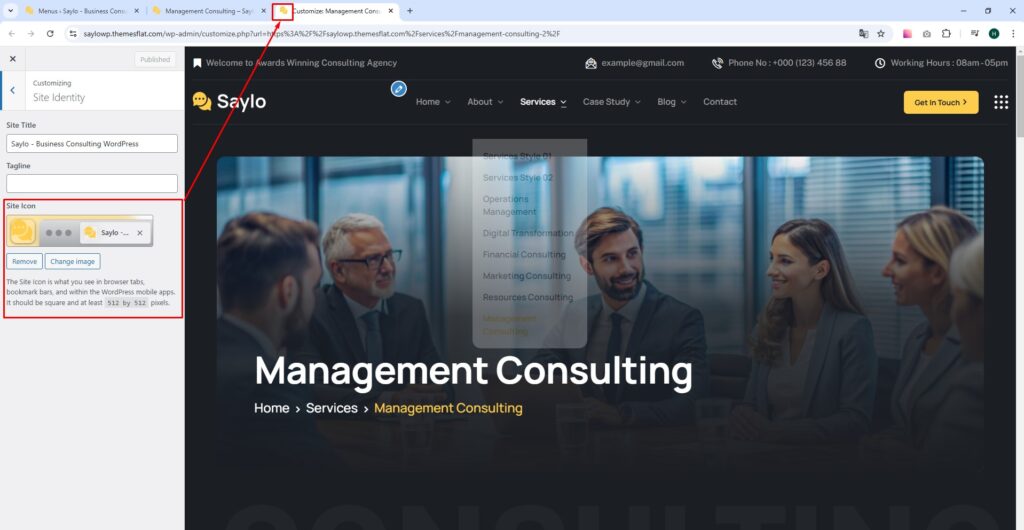
Tagline: A few words to describe your site
Site Icon: Site Icons are what you see in browser tabs, bookmark bars, and within the WordPress mobile apps.
- Site Display
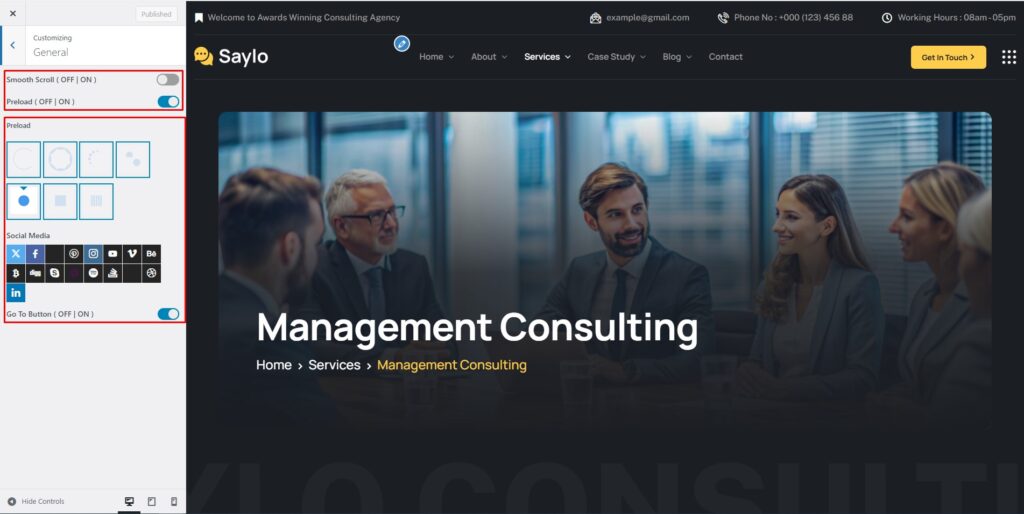
To Customize Theme you go to: Dashboarb -> Appearance -> Customize -> General
- Enable Smooth Scroll: Enabled Smooth Scroll or not
- Enable Preload: Displayed while loading to another page
- Go To Button: Enabled Go To Button or not
2.Header
To setup Header layout, please navigate to Dashboard > Appearance > Customize > Header.
- Custom Logo
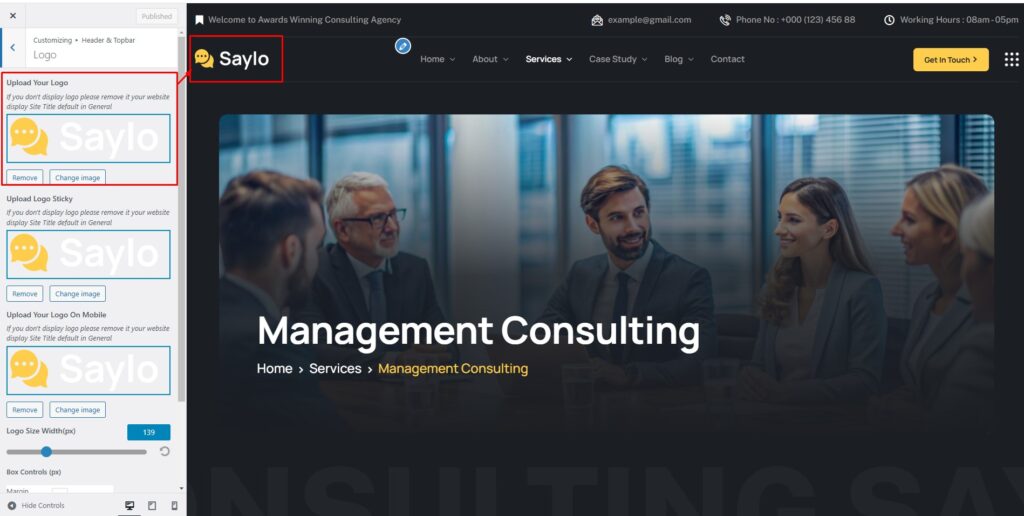
Upload Your Logo: Drag or select your new logo on website here
- Upload Logo Sticky: You can edit the sticky logo
Upload Your Logo On Mobile: Drag or select your new logo on mobile here
Logo Size: Choose the size for the Logo
Box Controls: Adjust padding and margin for logo
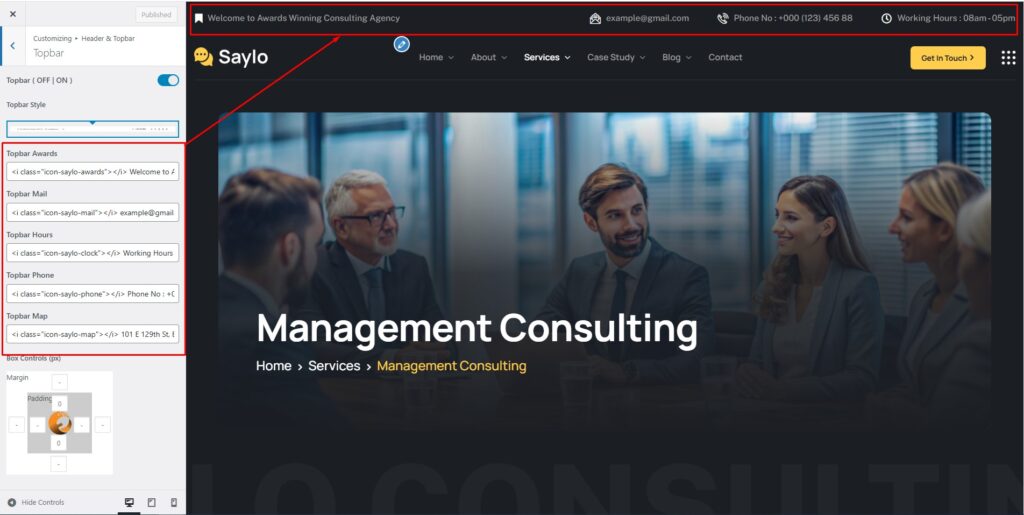
- Topbar
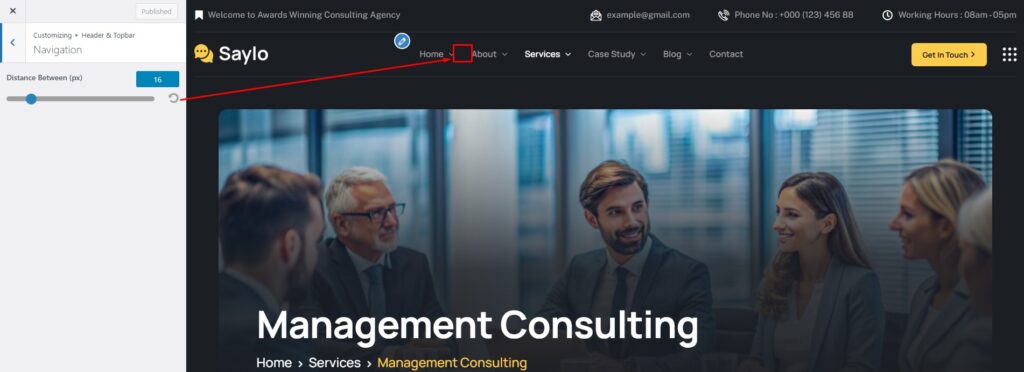
- Custom Menu
- Header Options
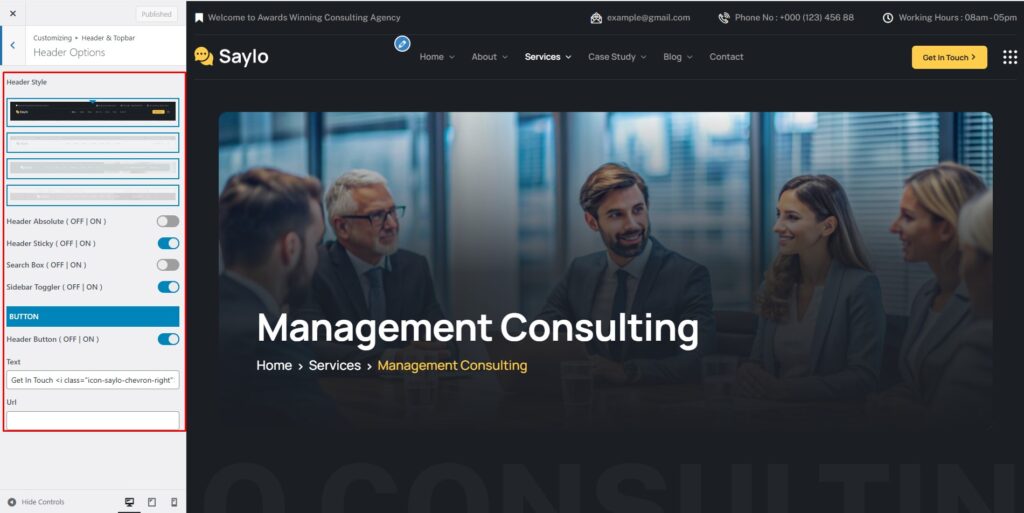
Header Style: Choose the type of header you want to display by default on your website
Header Sticky: Enabled Header Sticky or not
Search Box: Enabled Search Box or not
Sidebar Toggler: Enabled Sidebar Toggler or not
- Custom Menu
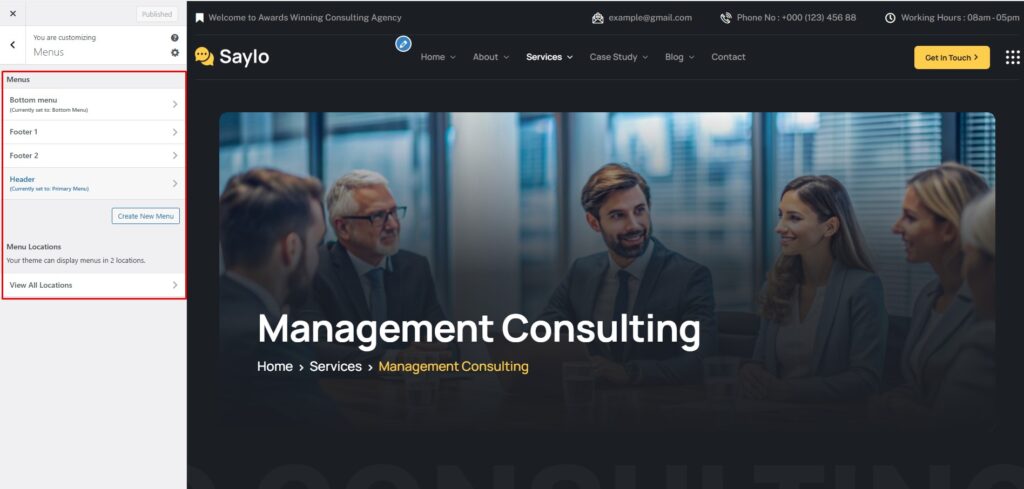
To setup Custom Menu layout, please navigate to Dashboard > Appearance > Customize > Menus
Select 1 menu to edit or create new
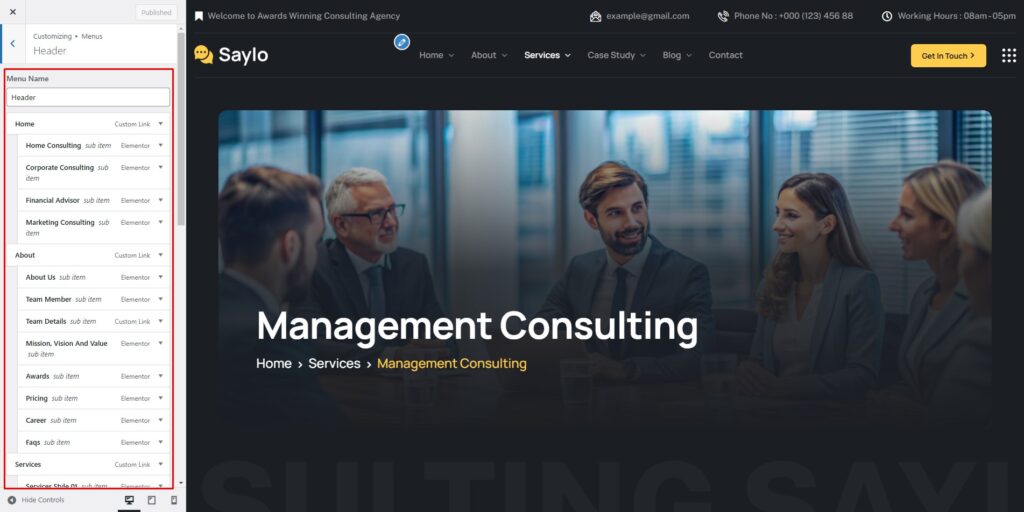
Drag and drop to change the menu here
3.Page Title & Breadcrumb
- Page Title Style
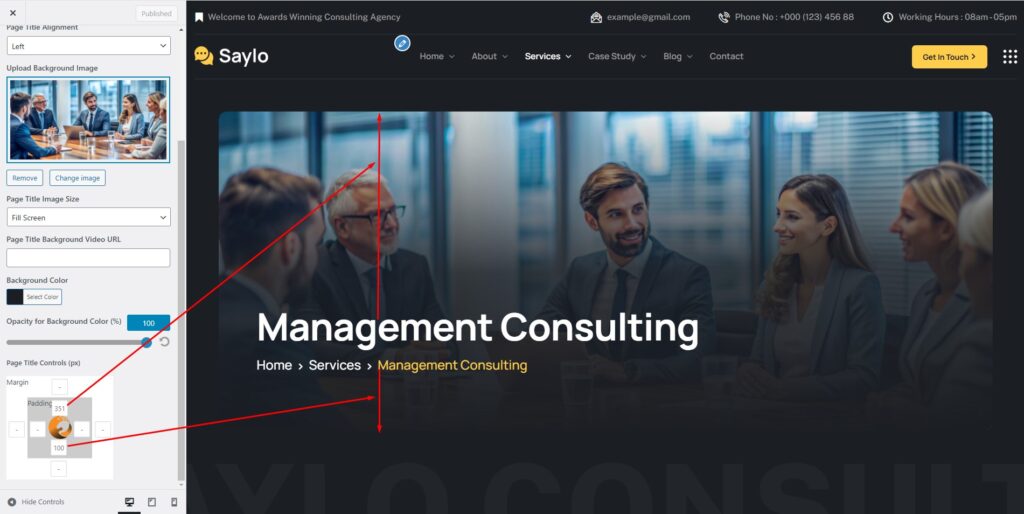
- To setup Custom Page Title Style layout, please navigate to Dashboard > Appearance > Customize > Page Title > Page Title
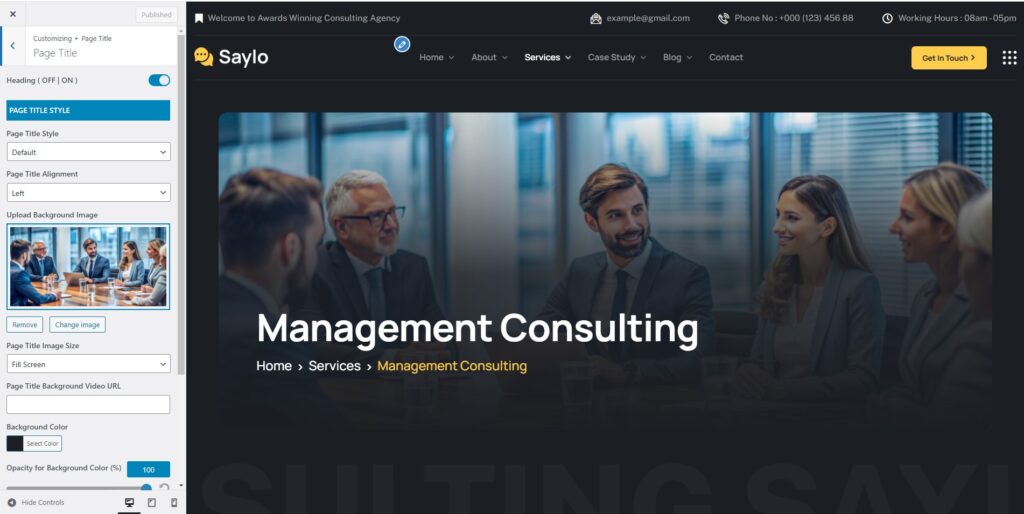
- Edit the Page Title Controls here:
- Breadcrumb
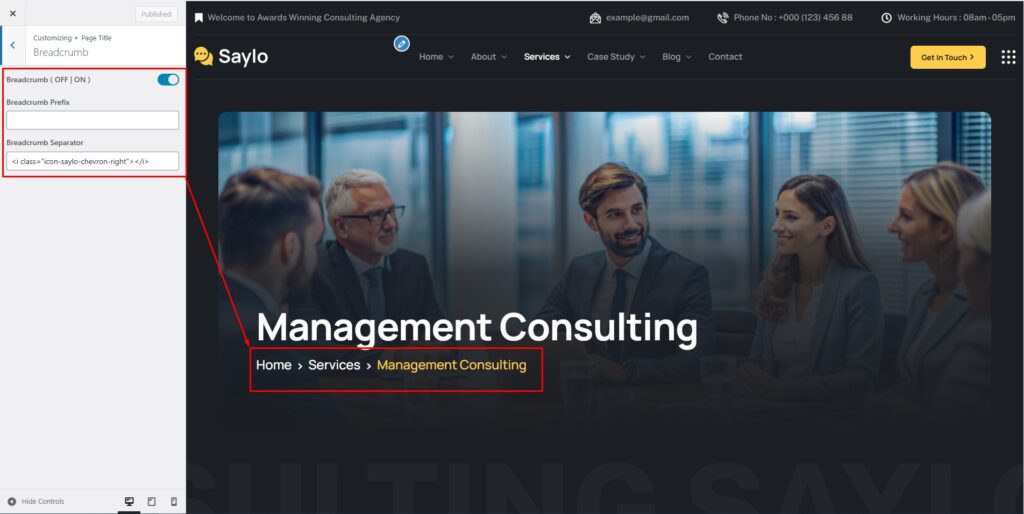
Enable Breadcrumbs: Turn on/off to show/hide the breadcrumbs
- Header Options

- Breadcrumb Prefix: Enter prefix text for the breadcrumb
- Breadcrumb Separator: Enter the character you want to use as the separator of breadcrumb
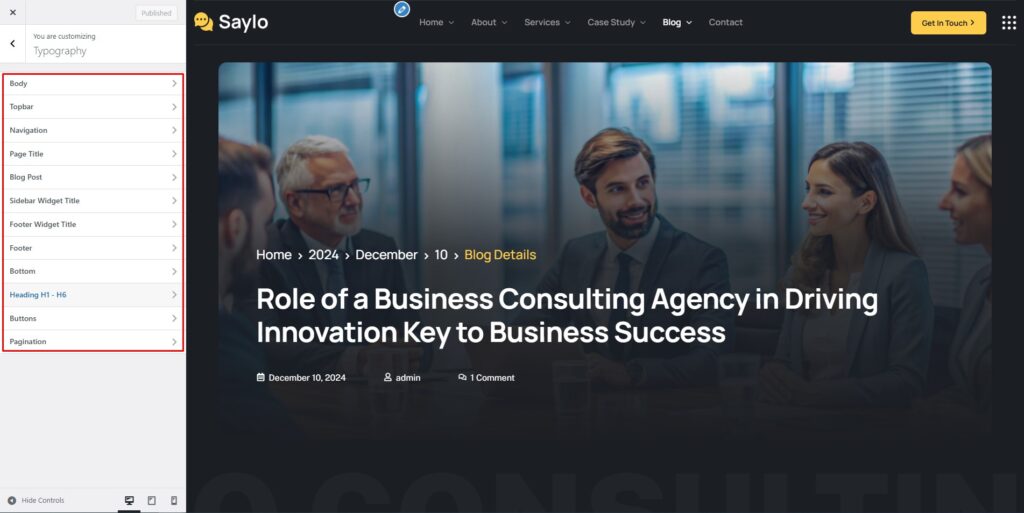
4.Typography
To setup Custom Page Title Style layout, please navigate to Dashboard > Appearance > Customize > Typography
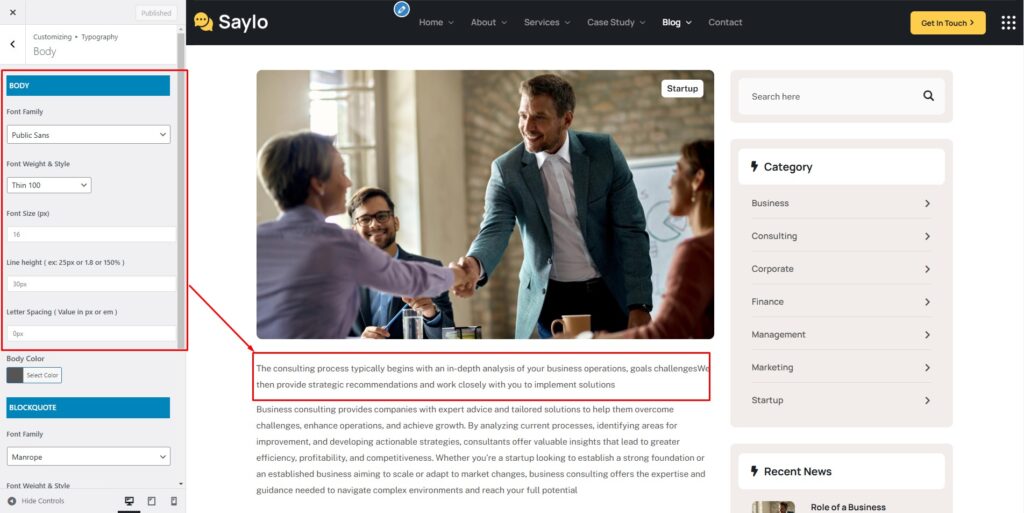
- Body Font
- You can select Font family, Font size Font weight or Font color for the body text
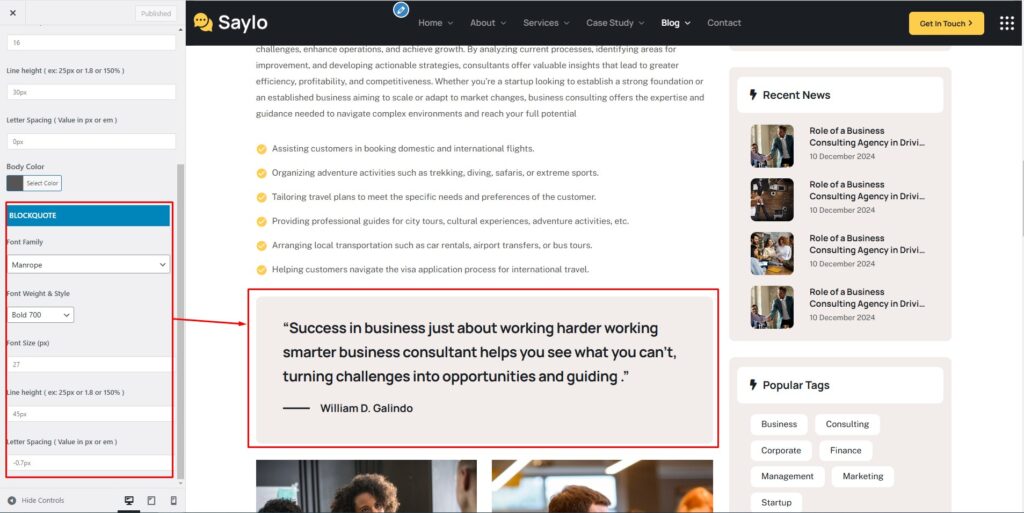
- Blockquote Typography
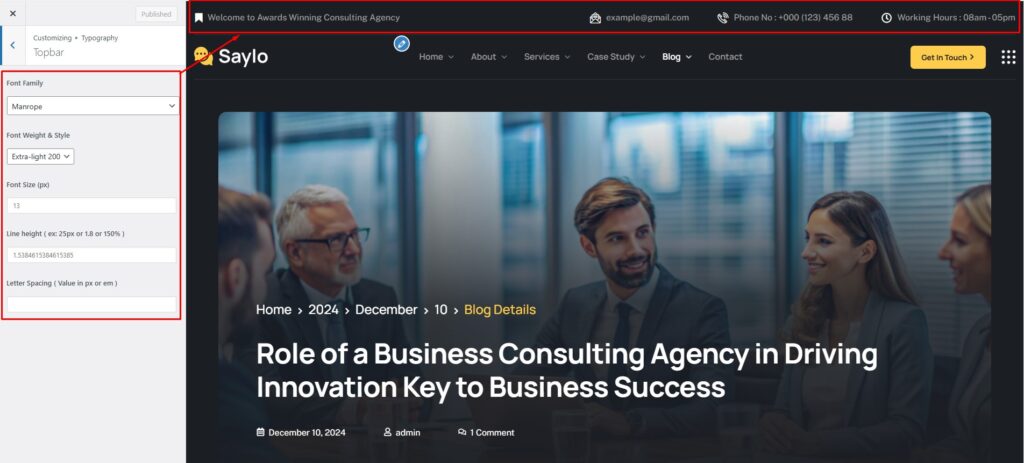
- Topbar Font
You can select Font family, Font size Font weight or Font color for the topbar text
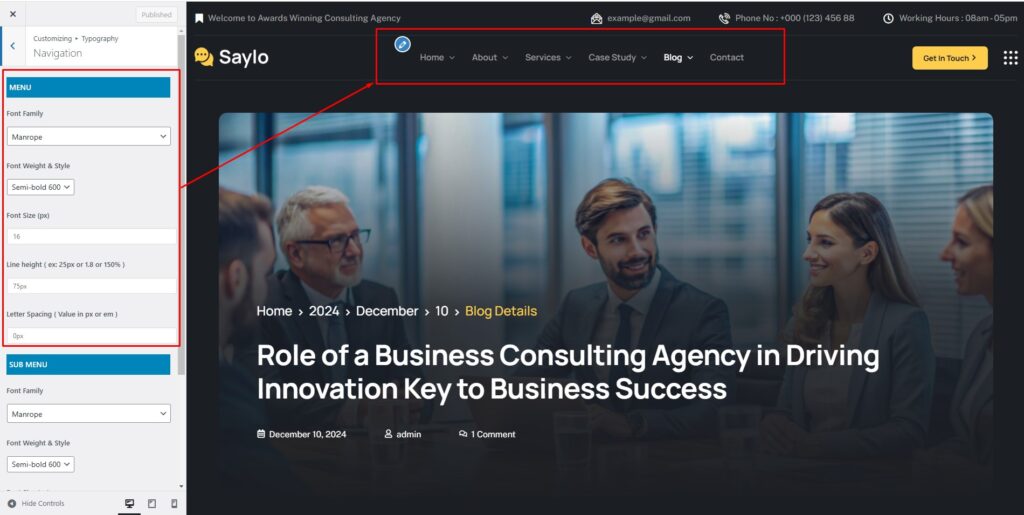
- Menu Font
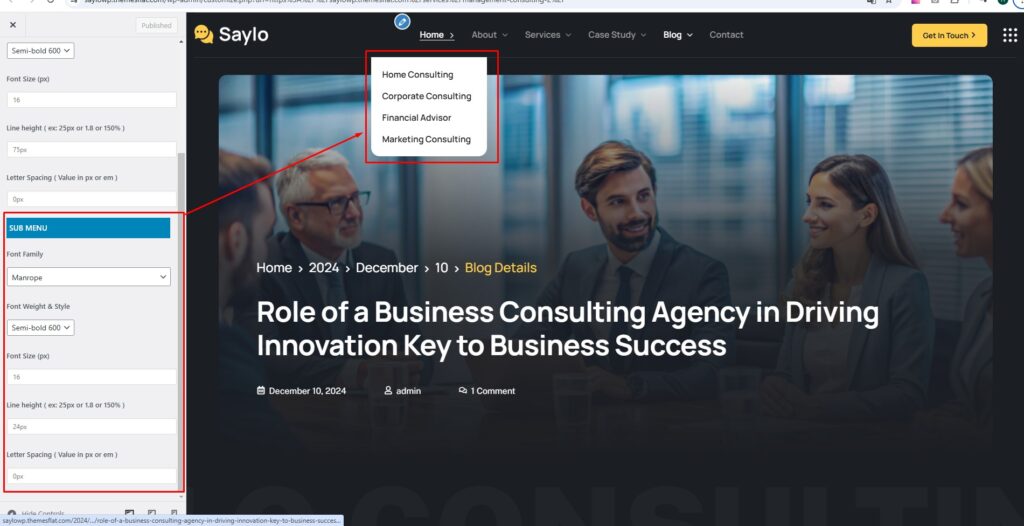
- You can select Font family, Font size Font weight or Font color for the menu text, submenu text
- Sub menu
- Heading Font
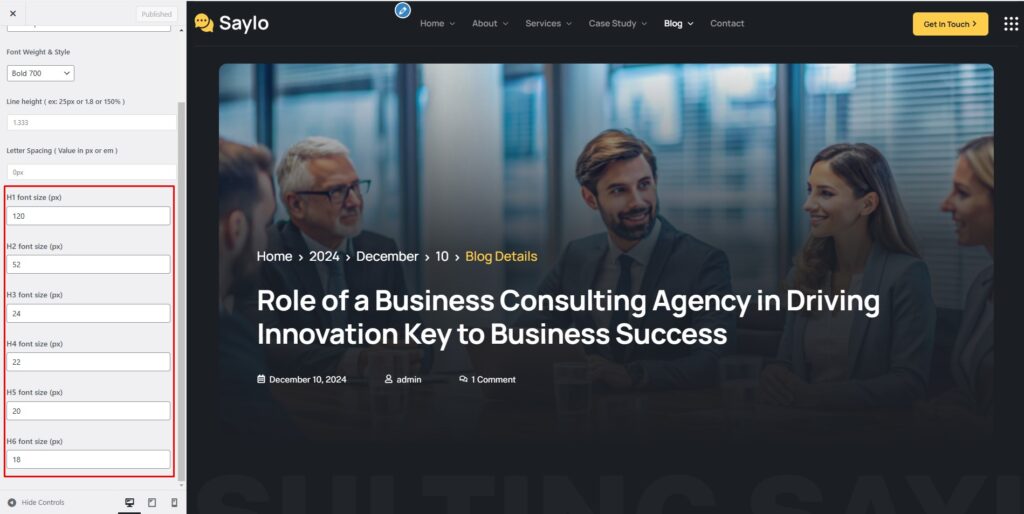
- And you can edit a lot here
5.Layout & Styles
In the section Layout & Styles, we provide some options to customize the theme layout and styles.
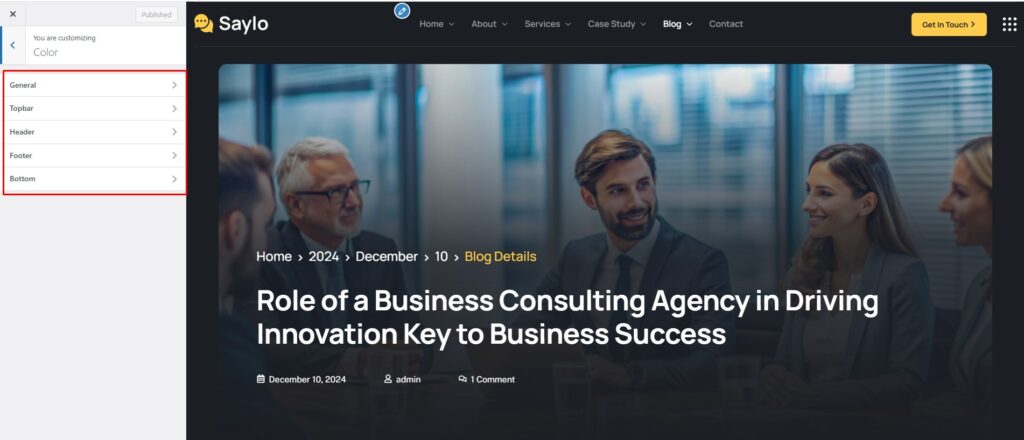
- Scheme Color
- To setup Custom Page Title Style layout, please navigate to Dashboard > Appearance > Customize > Color
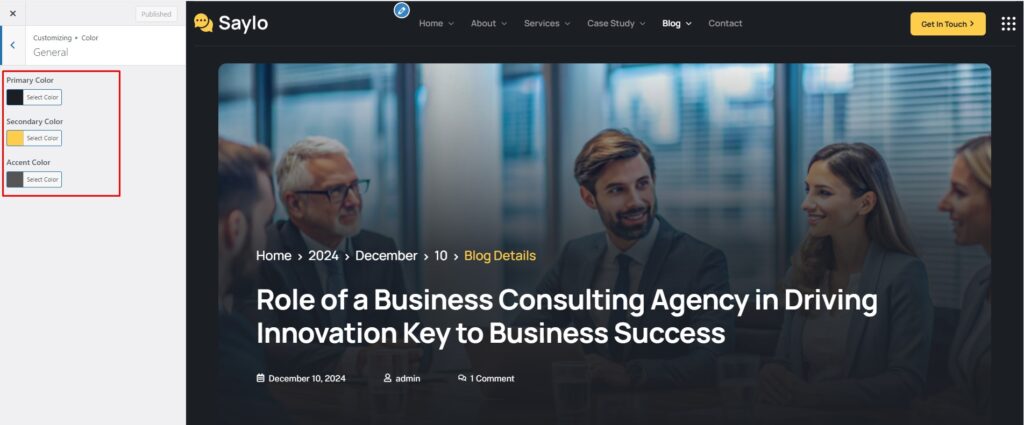
- With this option, you can change unlimited color for your General: Primary Color, Secondary Color, Accent Color, Background Color, please navigate to Dashboard > Appearance > Customize > Color > General
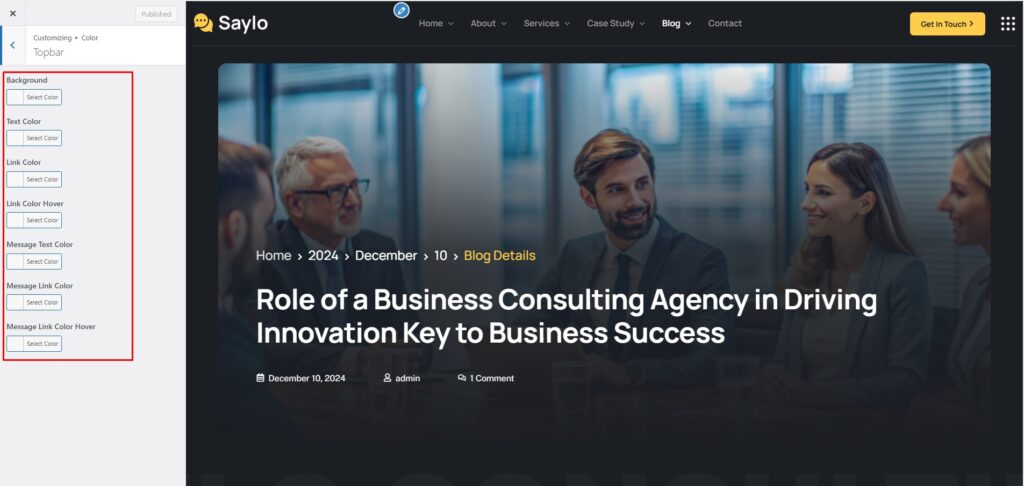
With this option, you can change unlimited color for your Topbar, please navigate to Dashboard > Appearance > Customize > Color > Topbar
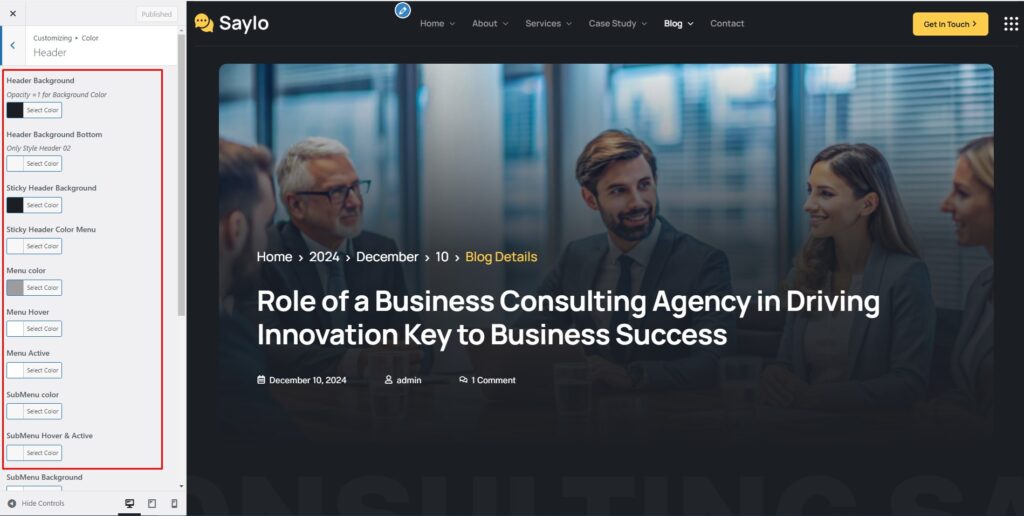
- With this option, you can change unlimited color for your Header, please navigate to Dashboard > Appearance > Customize > Color > Header
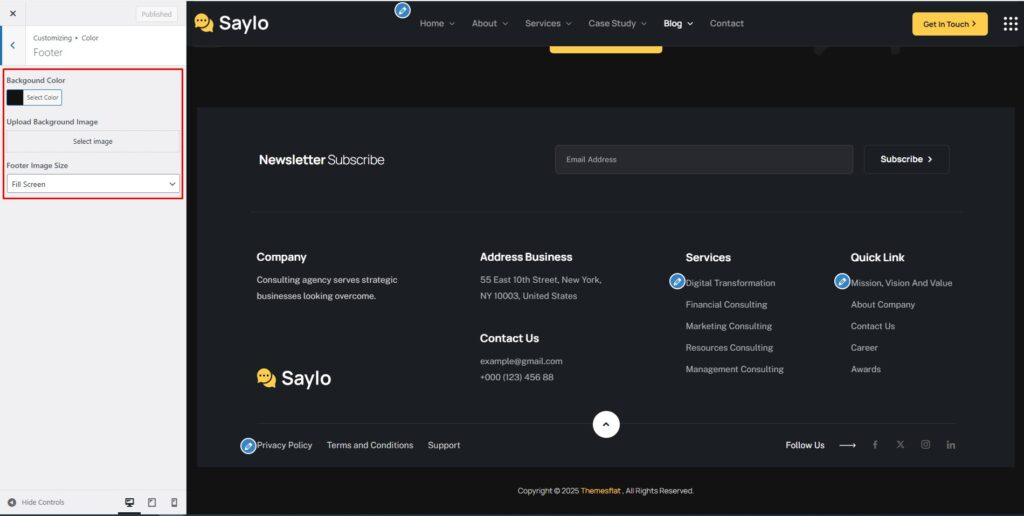
- With this option, you can change unlimited color for your Footer, please navigate to Dashboard > Appearance > Customize > Color > Footer
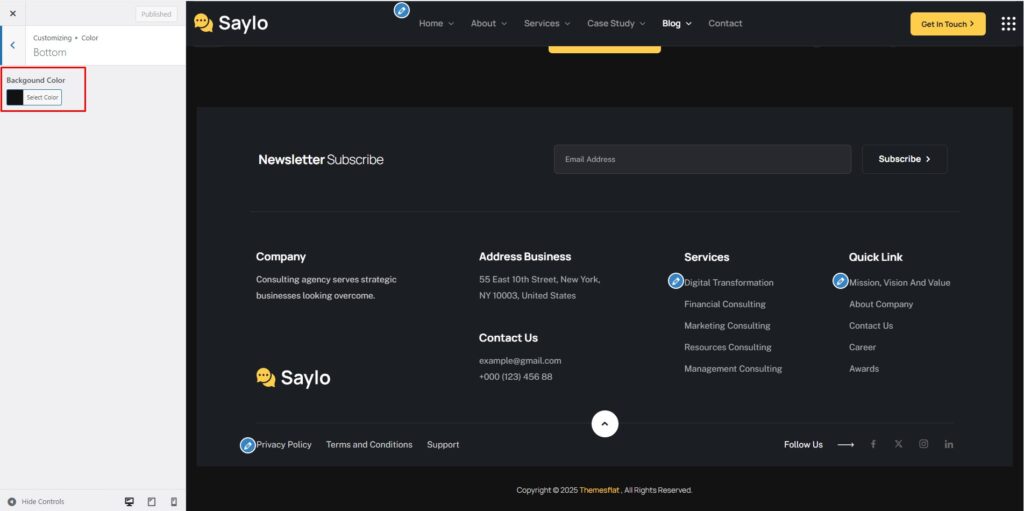
- Bottom
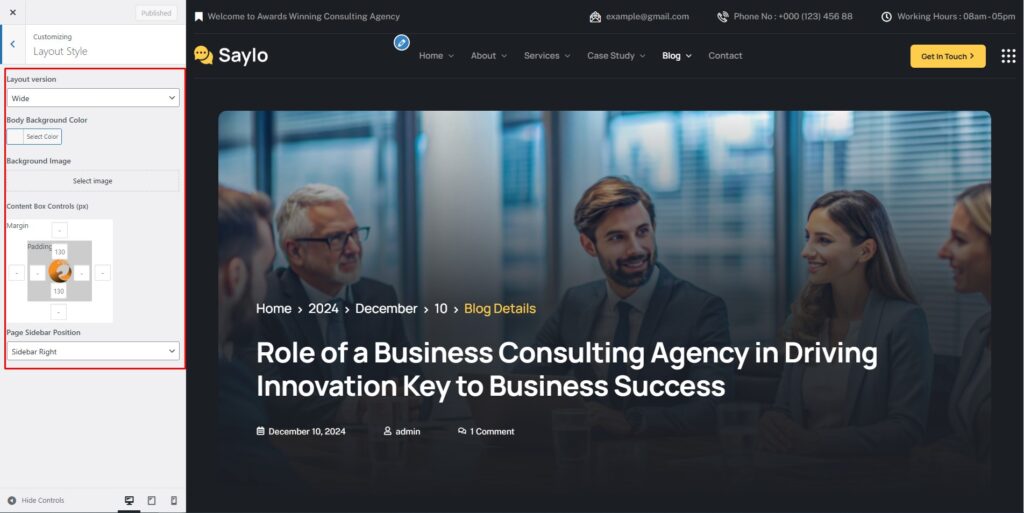
- Layout Style
- To start customizing Background Image, in the Admin page please go to Dashboard > Appearance > Customize > Background Image
- To start customizing Widgets, in the Admin page please go to Dashboard > Appearance > Widgets
6.Footer
- Edit Footer
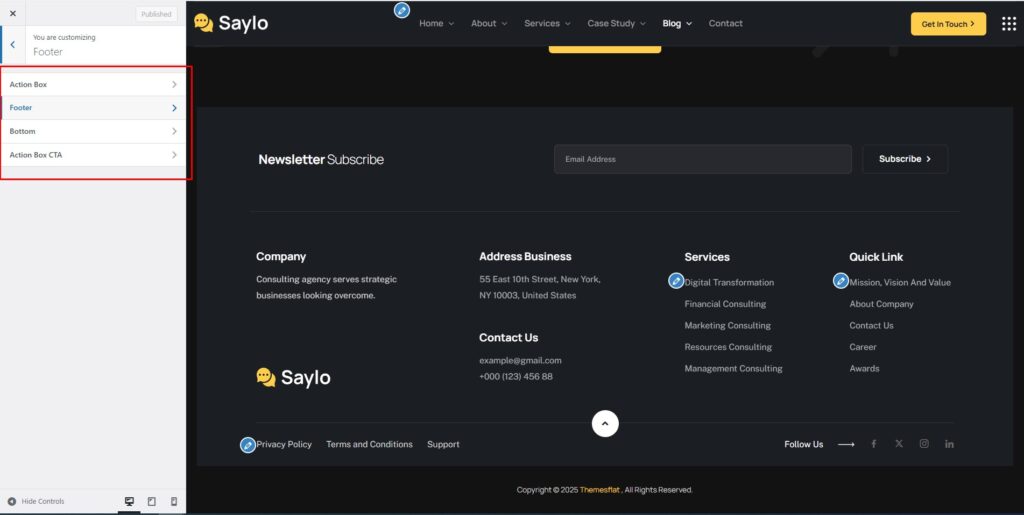
- To edit the default footer, in the Admin page please go to Dashboard > Appearance > Customize > Footer
- You can edit the contents of the Footer here
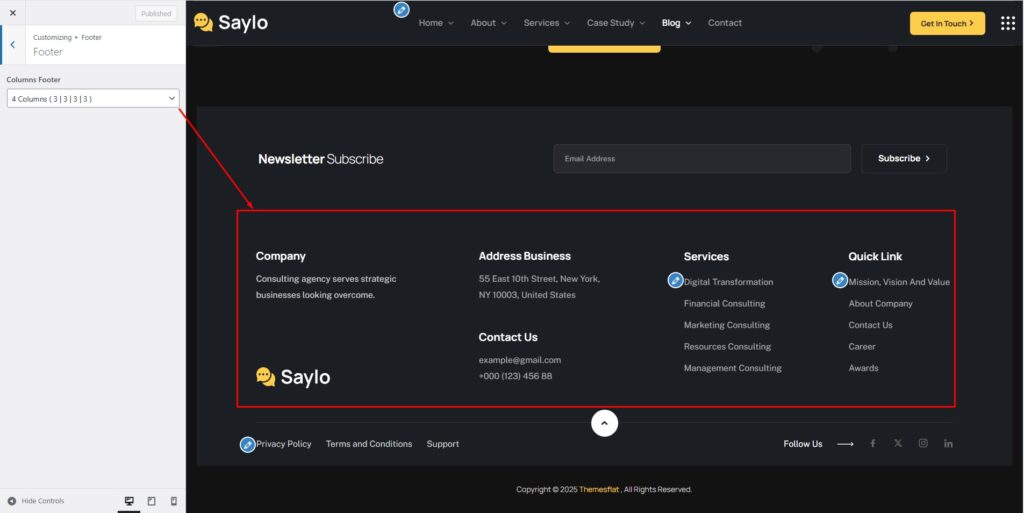
- Columns Footer
- You can edit the contents of the Columns Footer here
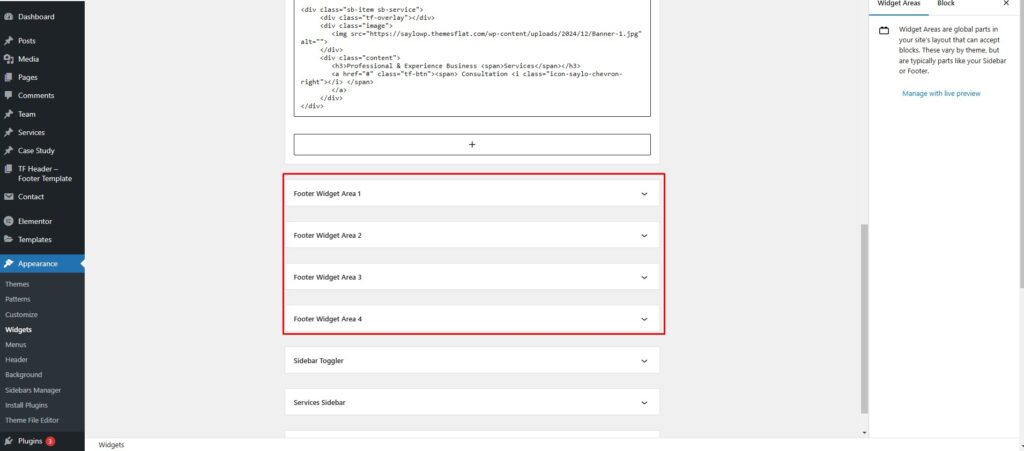
Go to Dashboard -> Appearance -> Widgets: you can edit each column information here
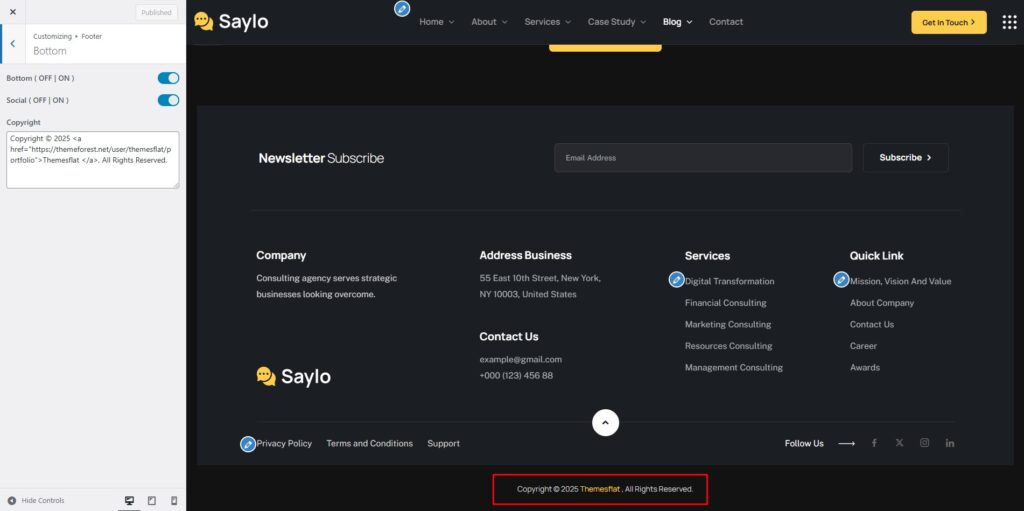
- Bottom
- You can edit the contents of the Bottom here
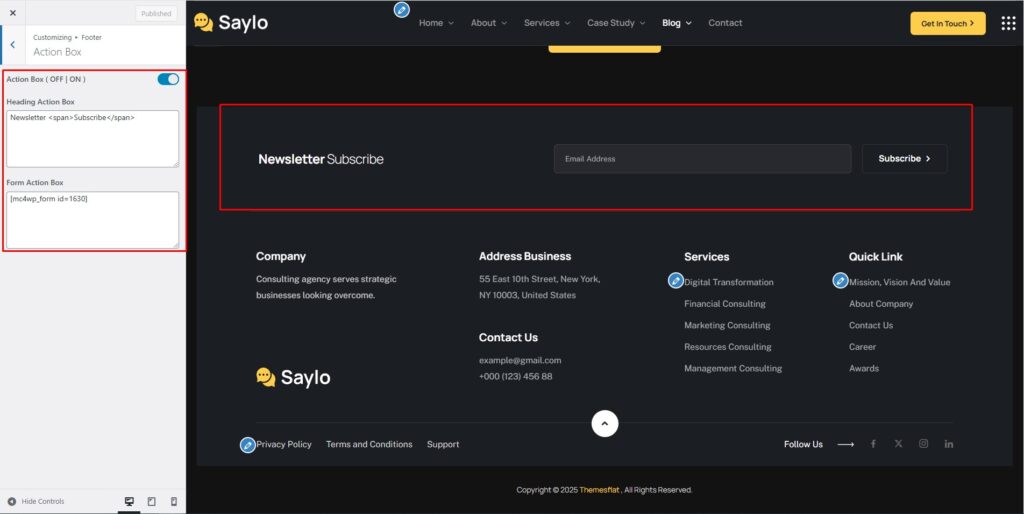
- Action Box
- You can edit the contents of the Action Box here
Post Type
To Customize Post you go to: Dashboarb -> Appearance -> Customize -> Content
1.Blog archive
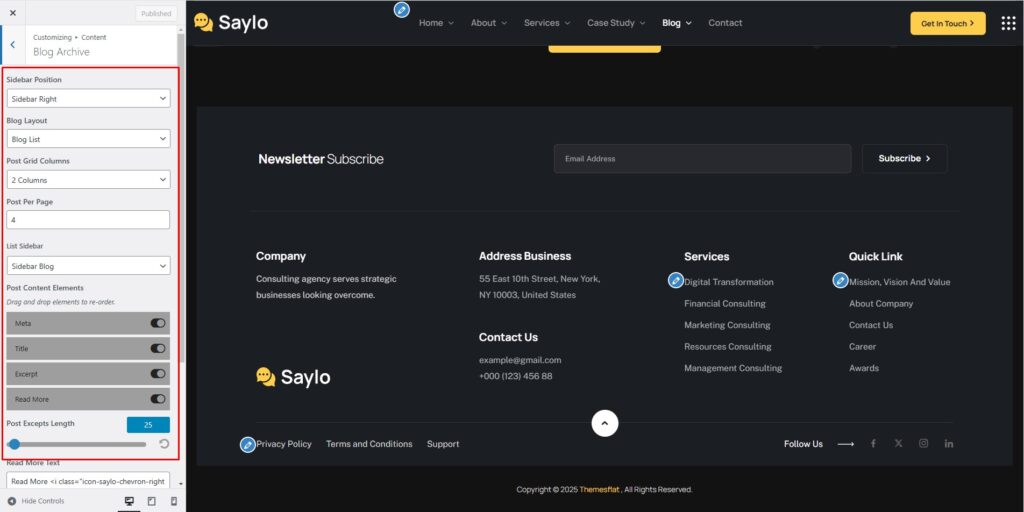
- Sidebar Position: Select sidebar position on the posts page (No Sidebar/Left/Right)
- Blog Layout: Select layout style for List (List/Grid)
- Post Grid Columns: Choose to display the number of columns of the article
- List Sidebar: In the dropdown box, select the sidebar you want to display on posts page
- Post Content Elements: Drag and drop elements to re-order.
- Post Excepts Length: This option is only available when you turn on “Auto Post Excepts”. It uses to limit the content length which is shown on posts page
- Social Share: Enable or disable Social Share
- Readmore Text: You can modify the text of Read more button here
- Meta Elements:Drag and drop elements to re-order.
2.Blog Single
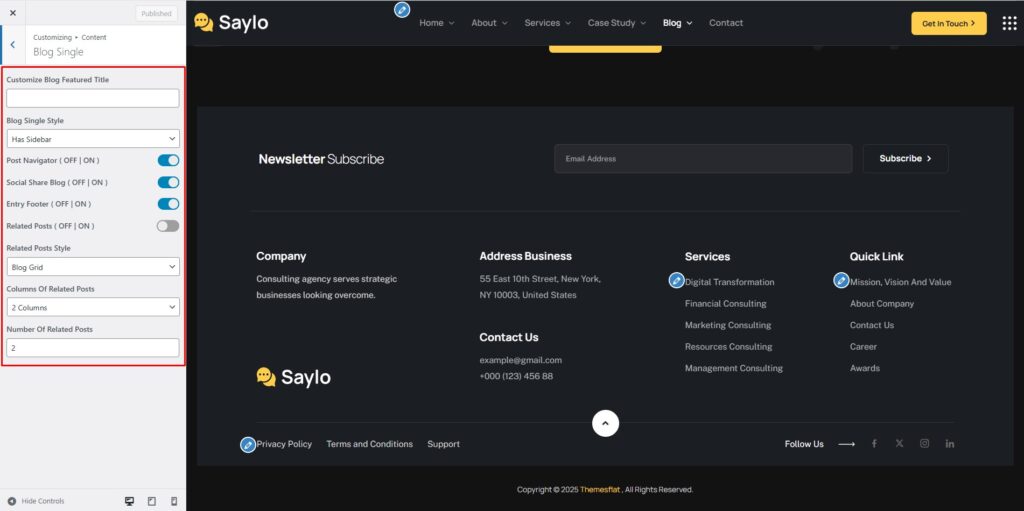
- Post Navigator: Enabled Post Navigator or not
- Related Posts: Enabled Related Posts or not
- Related Posts Style: Choose Related Posts Style (Blog List or Blog Grid)
- Columns Of Related Posts: Choose 2 Columns, 3 Columns, 4 Columns
- Number Of Related Posts: Number Of Related Posts
3.Team Archive
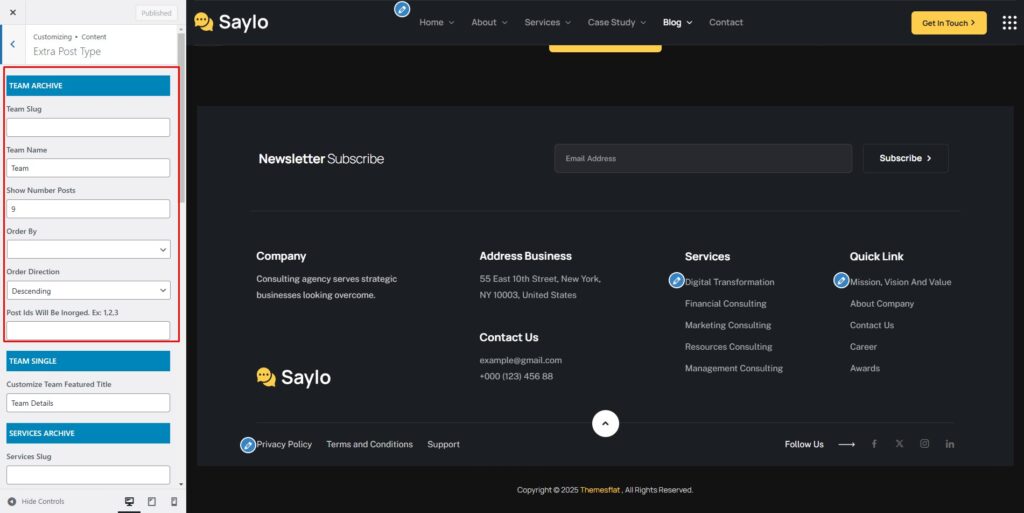
- Team Slug: You can modify the Portfolio Slug here
- Team Name: You can modify the Portfolio Name here
- Show Number Posts: Show number of posts on page
- Order By: sort by id, date…
- Order Direction: sort in ascending and reverse order
- Post Ids Will Be Inorged : show posts by id
4.Team Single
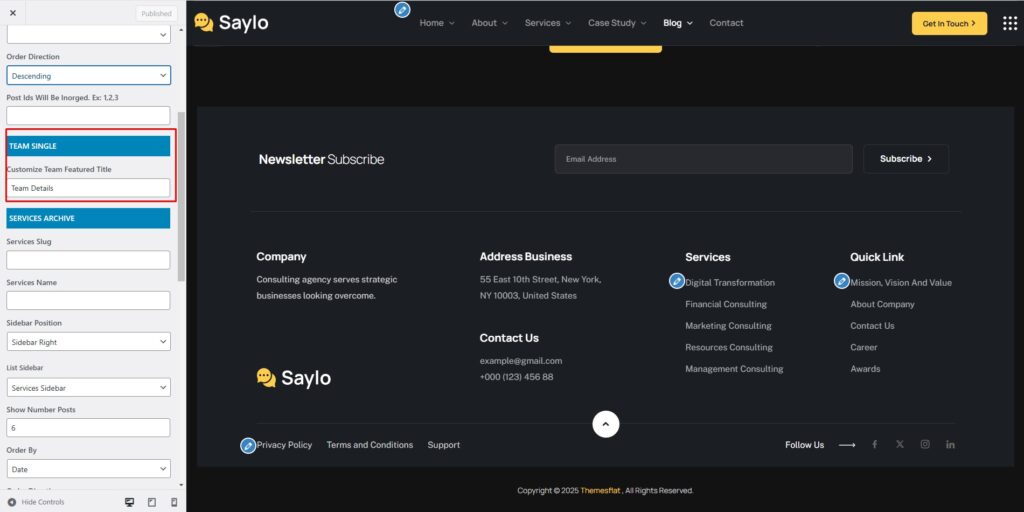
5.Services Archive
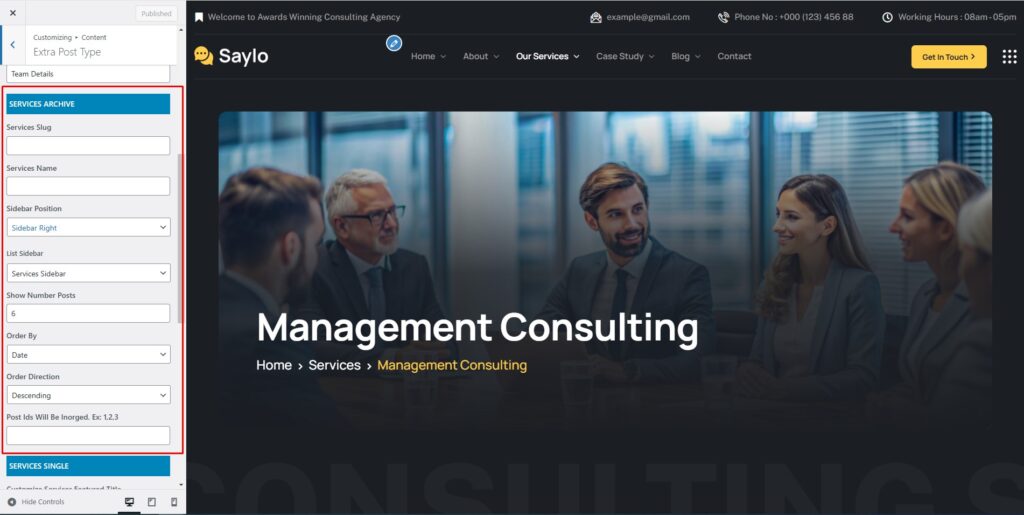
- Services Slug: You can modify the Services Slug here
- Services Name: You can modify the Services Name here
- Sidebar Position: Choose Sidebar Style
- List Sidebar: Choose Sidebar Style
- Columns Of Related Posts: Choose 2 Columns, 3 Columns, 4 Columns
- Number Of Related Posts: Number Of Related Posts
6.Services Single
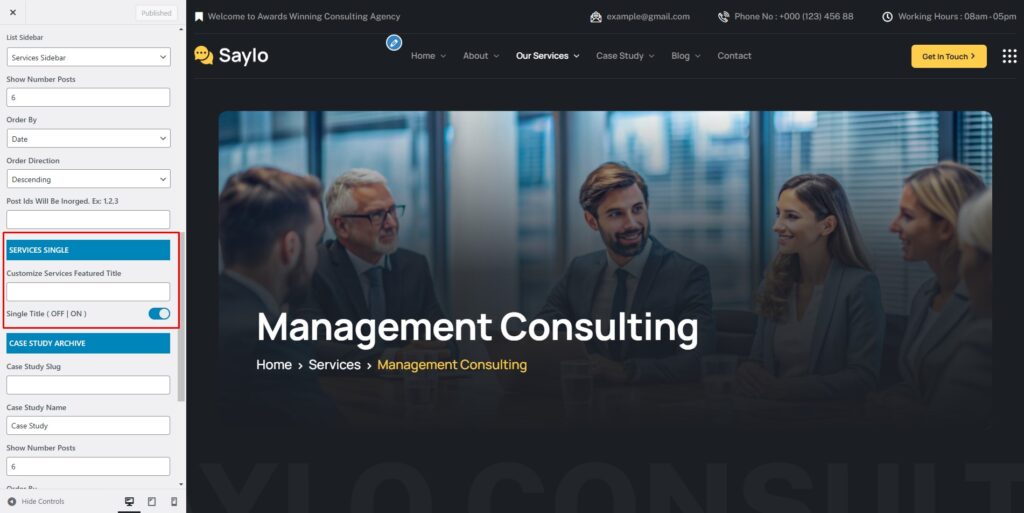
7.Case Study Archive
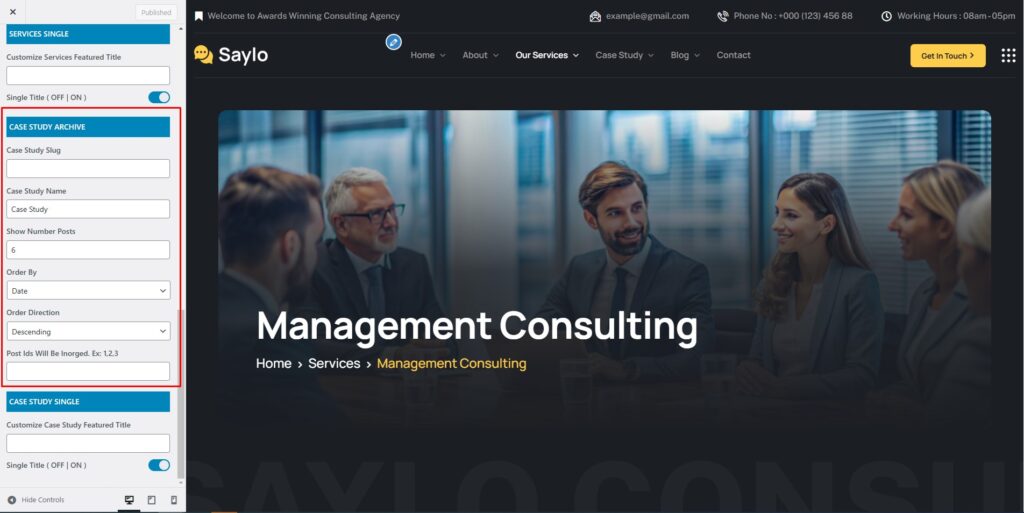
- Case Study Slug: You can modify the Portfolio Slug here
- Case Study Name: You can modify the Portfolio Name here
- Show Number Posts: Show number of posts on page
- Order By: sort by id, date…
- Order Direction: sort in ascending and reverse order
- Post Ids Will Be Inorged : show posts by id
8.Case Study Single
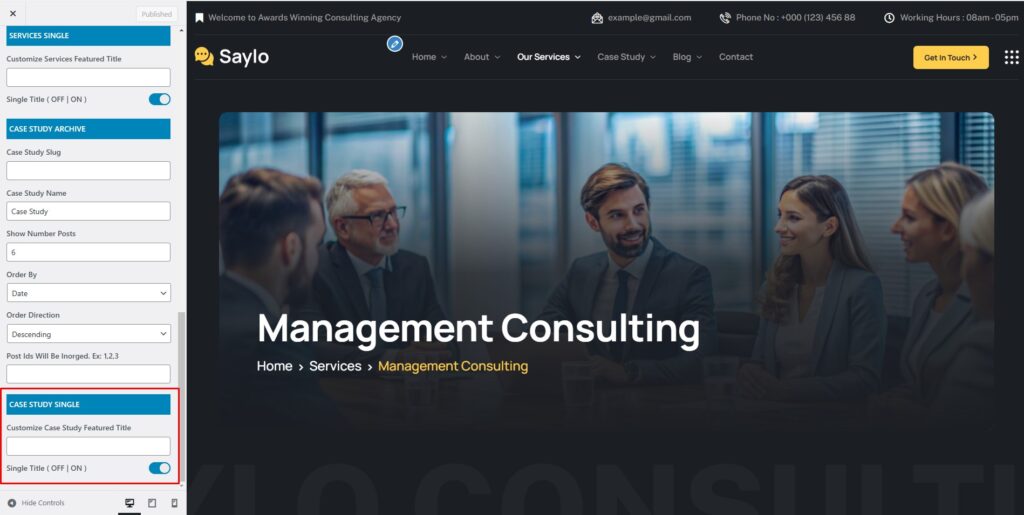
Creat Post Type
1.Services
- To create a Services list you go to: Dashboarb -> Services, then select the Product to edit and click Edit or click New Services
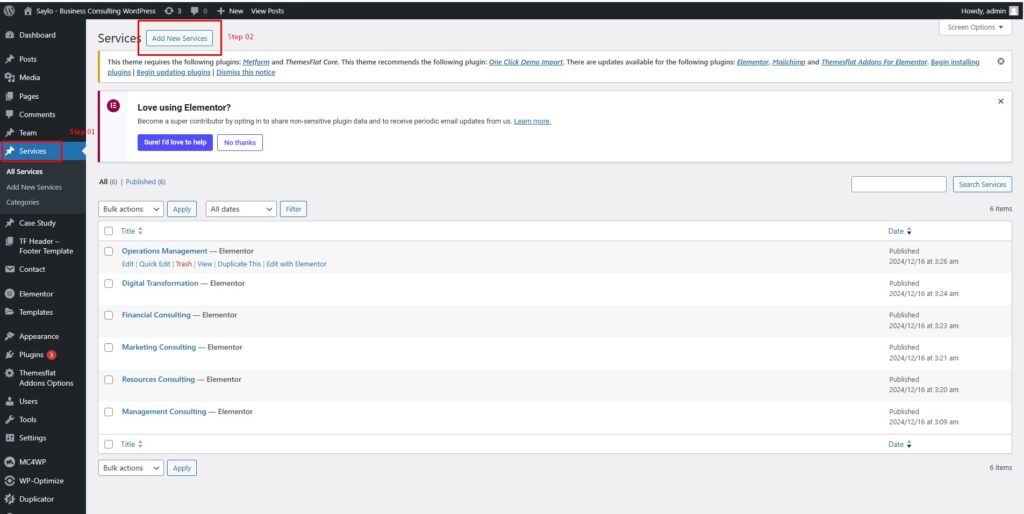
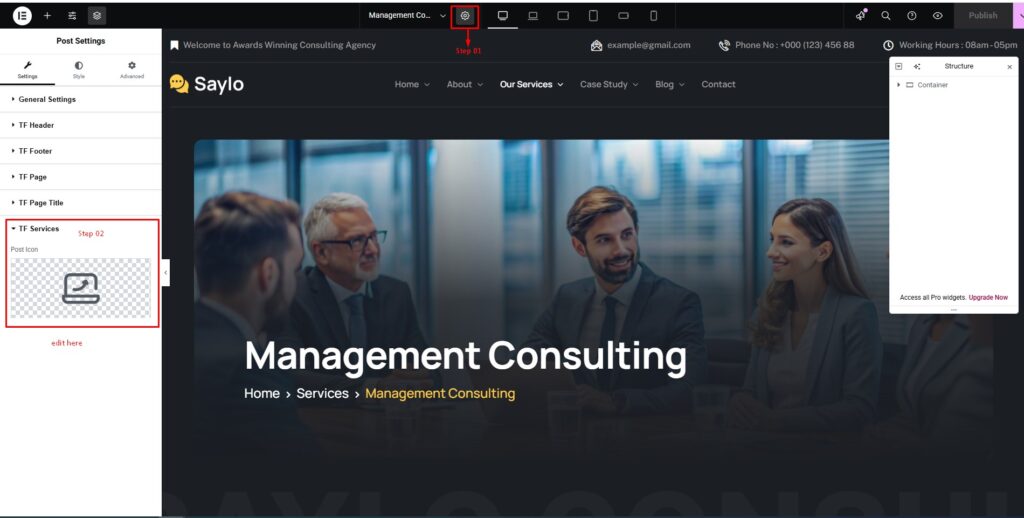
- Change icon of services you go to: Dashboarb -> Services -> Edit with Elementor
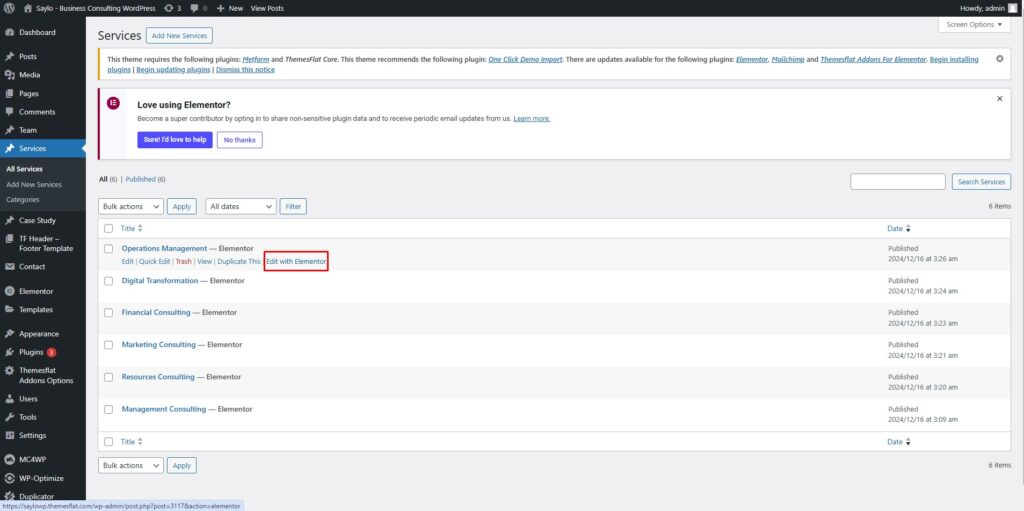
- you go to: Settings -> TF Services -> Choice icon
2.Team
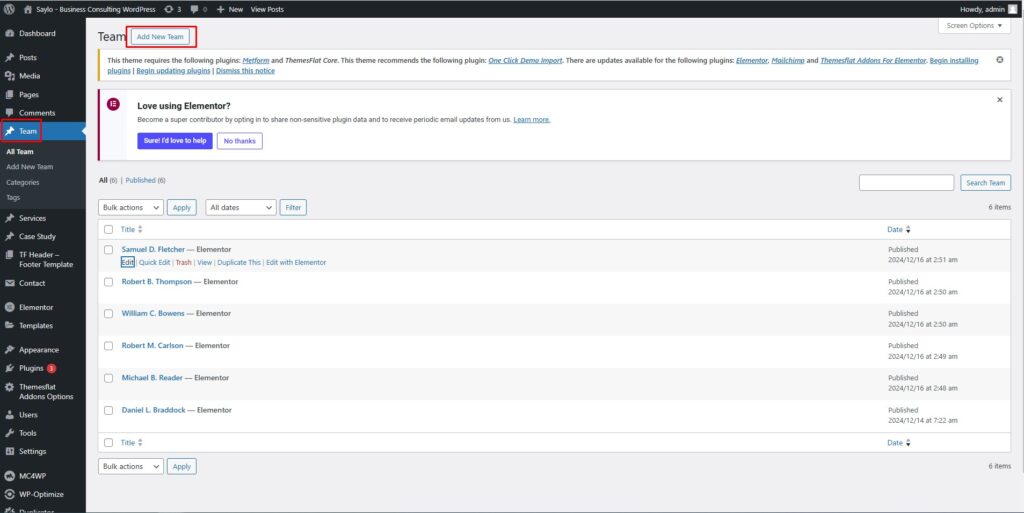
- To create a Team list you go to: Dashboarb -> Team, then select the Product to edit and click Edit or click New Services
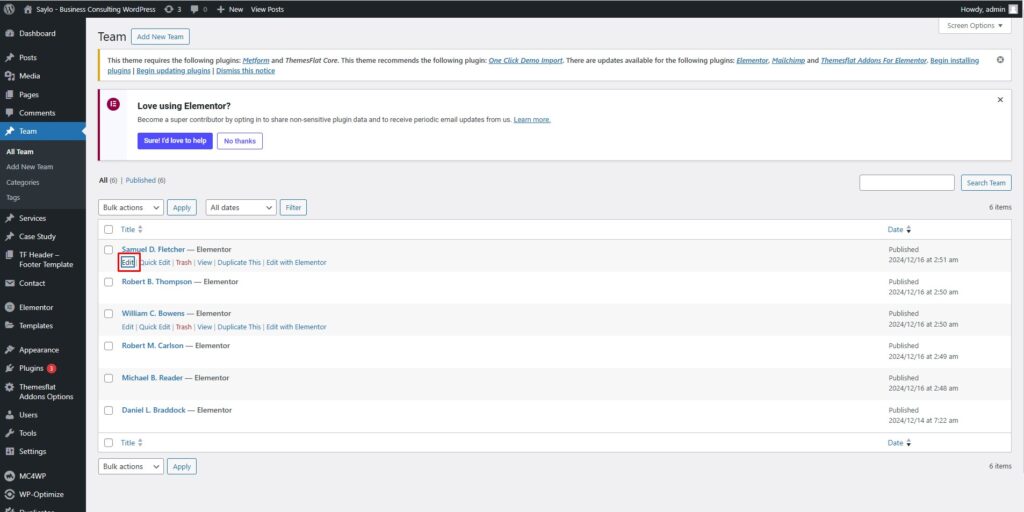
- Change info of Team you go to: Dashboarb -> Team -> Edit
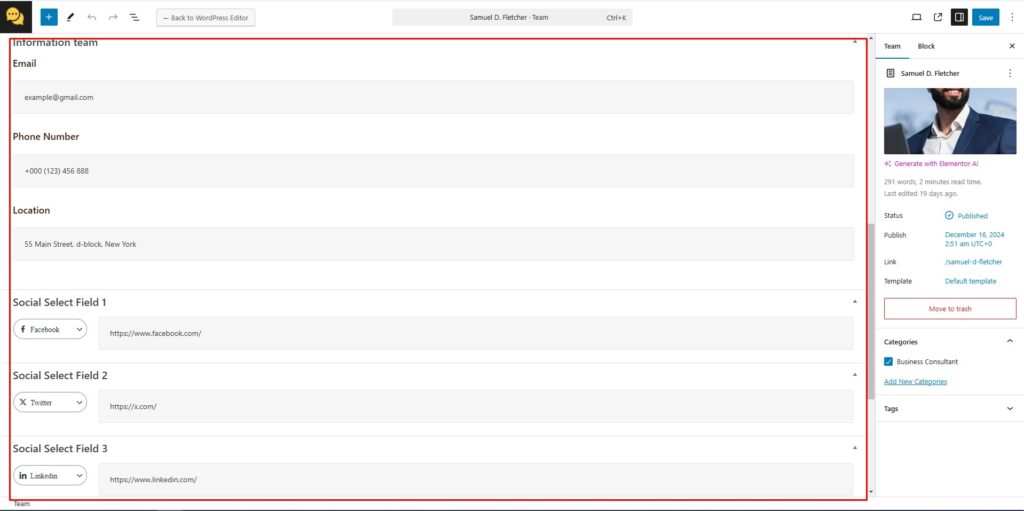
- Info: email, phone, Location, social
3.Case Study
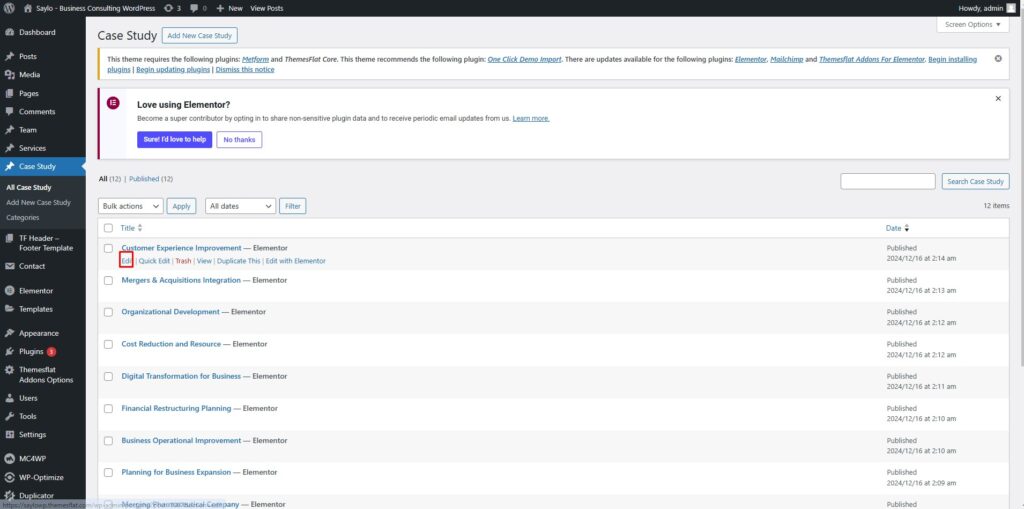
- To create a Case Study list you go to: Dashboarb -> Case Study, then select the Product to edit and click Edit or click New Case Study
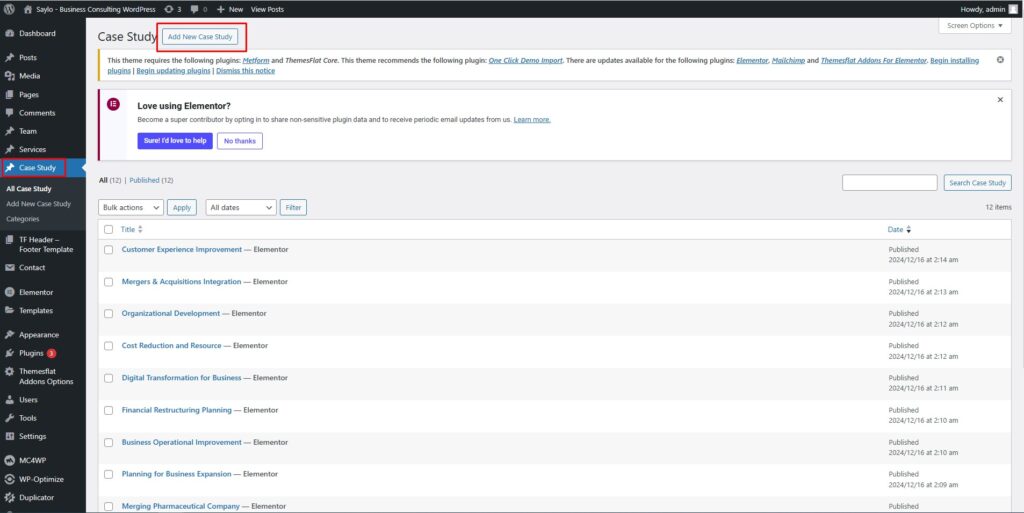
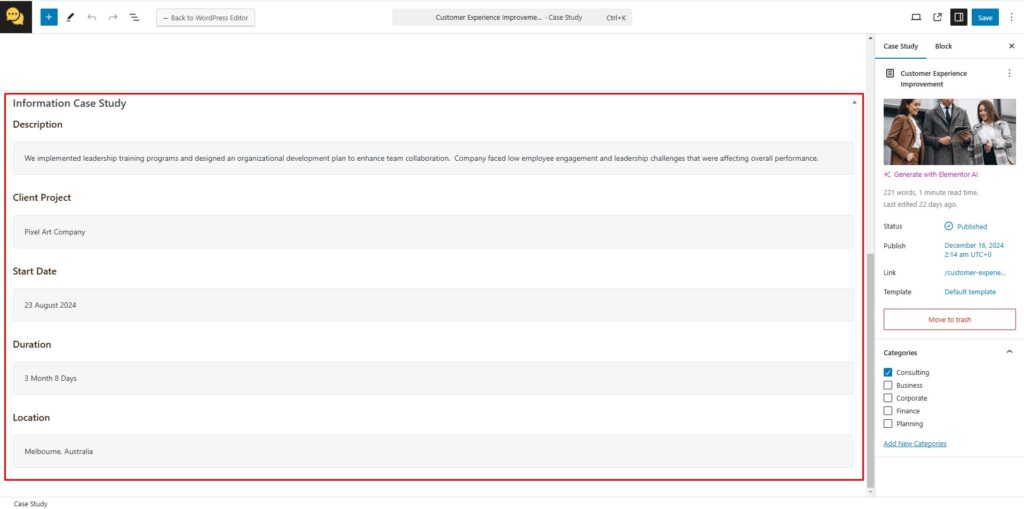
- Change info of Team you go to: Dashboarb -> Case Study -> Edit
- Info: email, phone, Location, social
Themesflat Addons
NOTE: to use all widgets of Themesflat addons, You select the page to edit or create a new page Edit with Elementor -> Elementor -> Themesflat Addons
1.TF Title Section
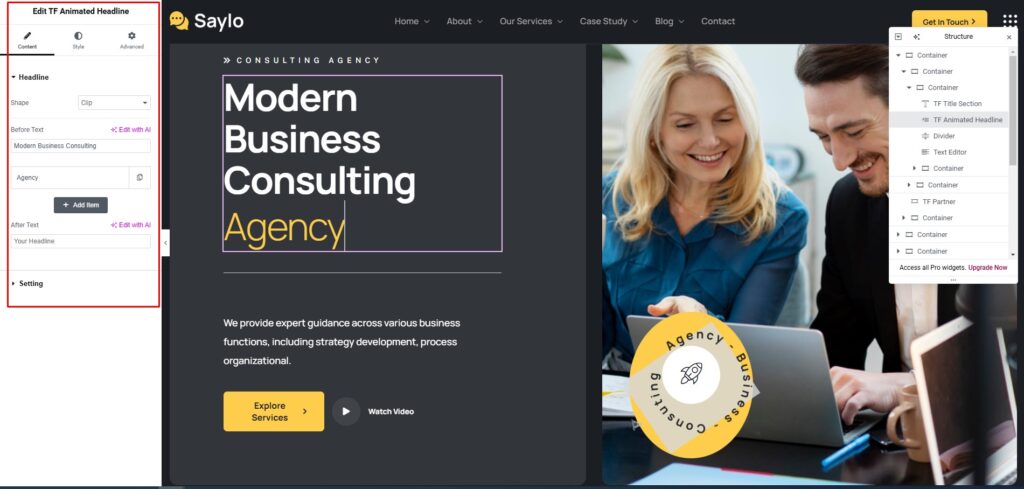
- You build it at Themesflat Addons
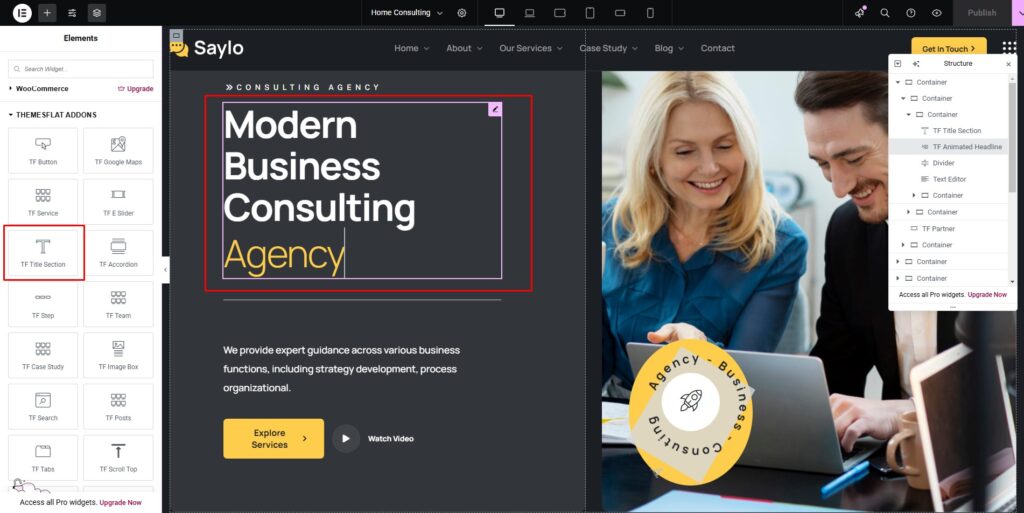
- You can customize at Content and Advanced
2.TF Button
- You build it at Themesflat Addons
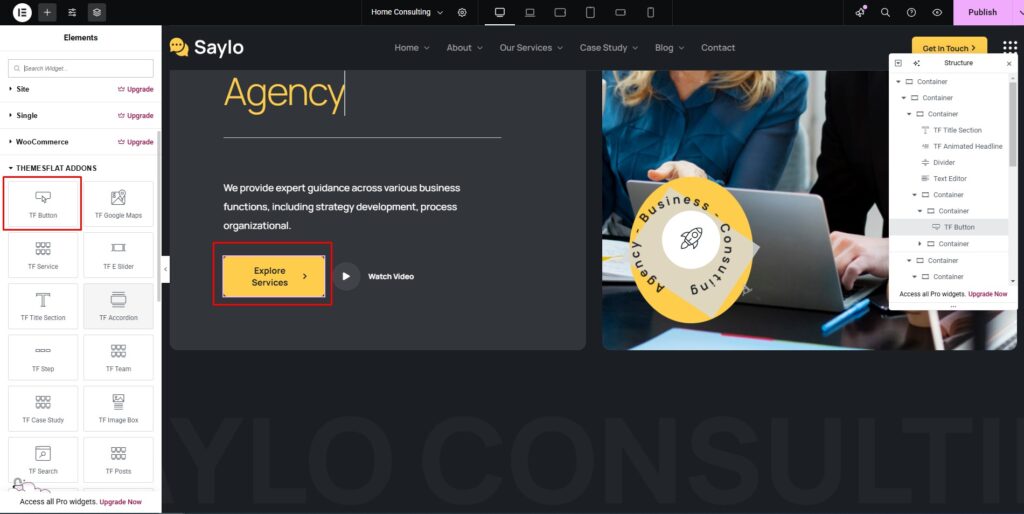
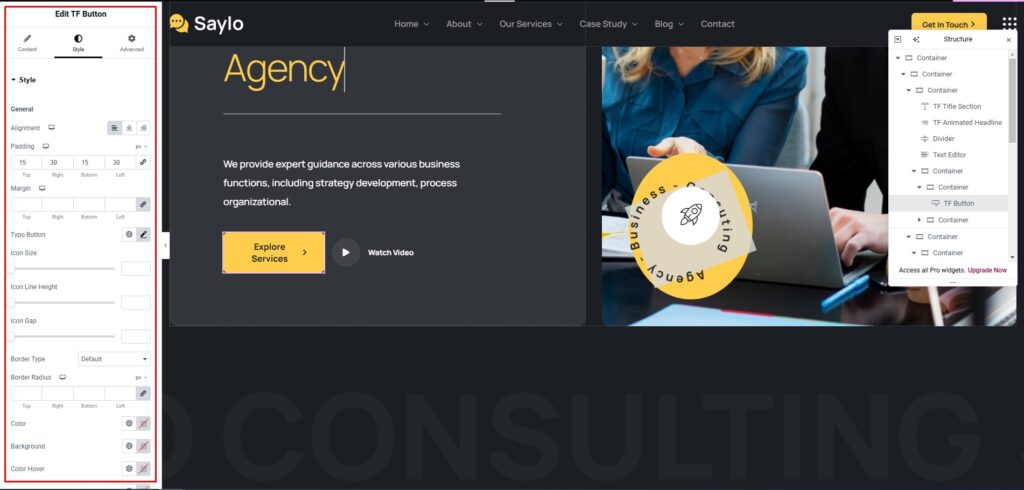
- You can customize at Content and Advanced
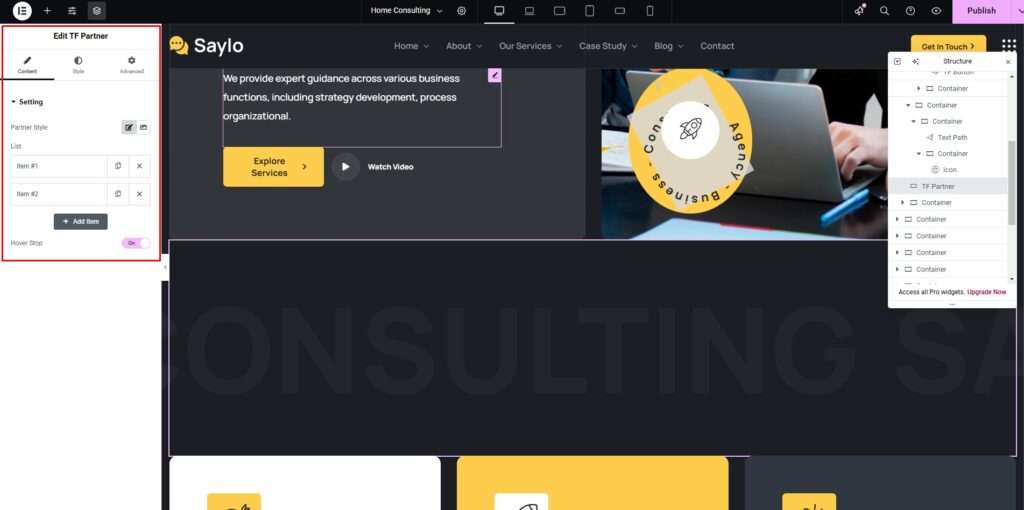
3.TF Partner
- You build it at Themesflat Addons
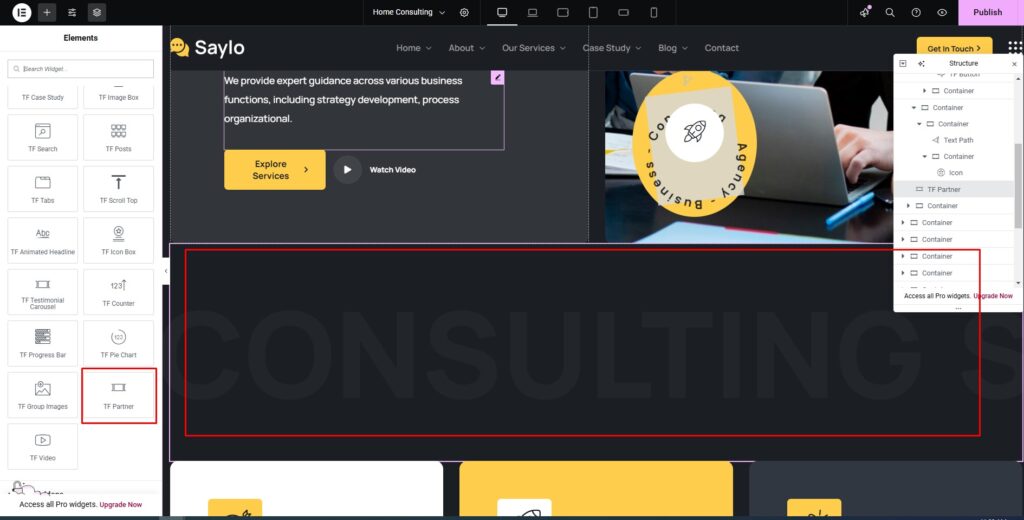
- You can customize at Content and Advanced
4.TF Services
- You build it at Themesflat Addons
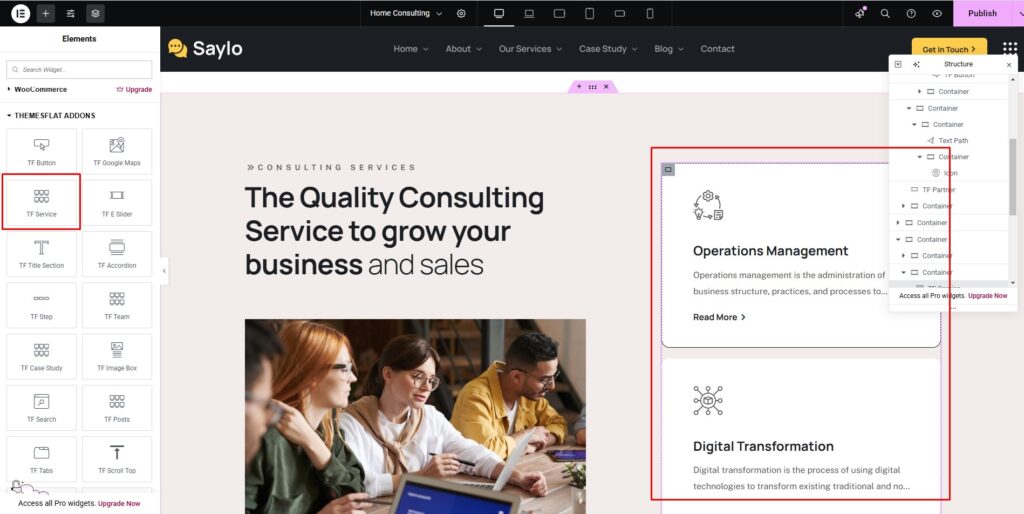
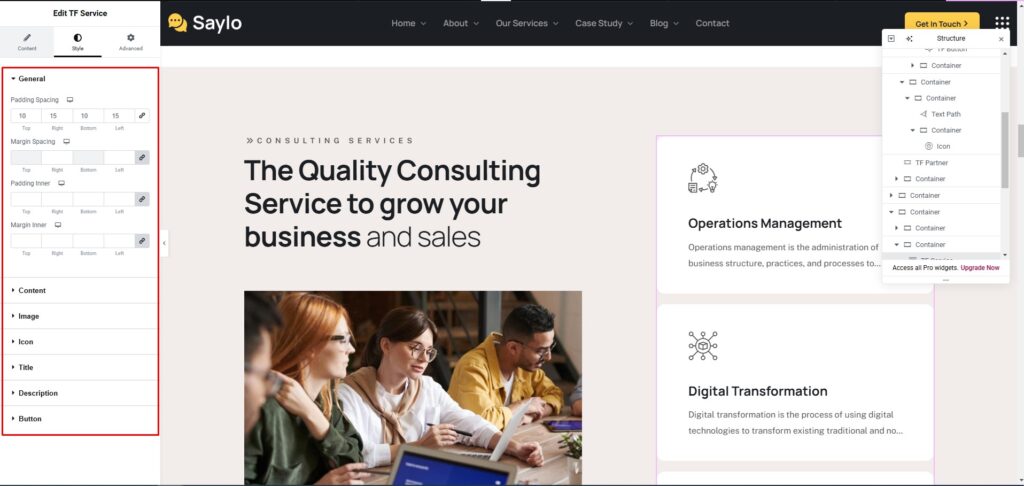
- You can customize at Content and Advanced
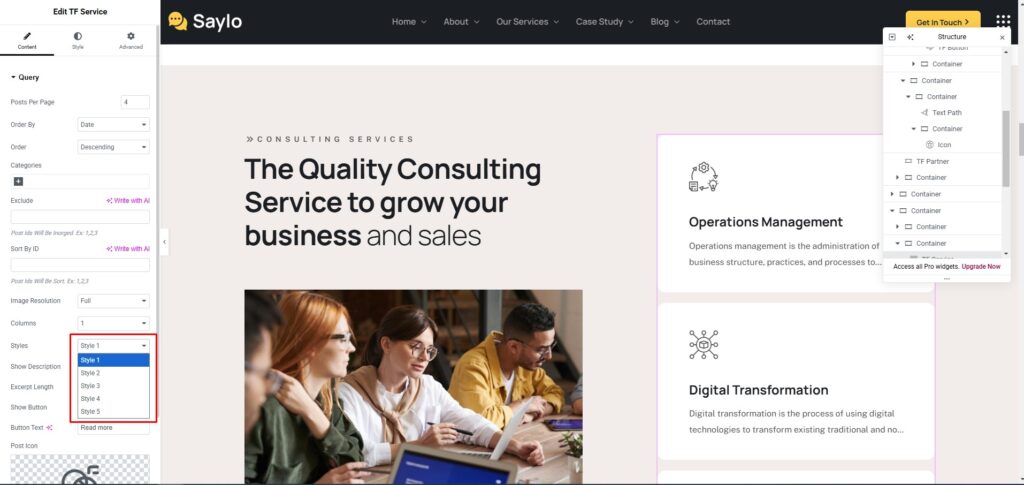
- You can choose for the style of services
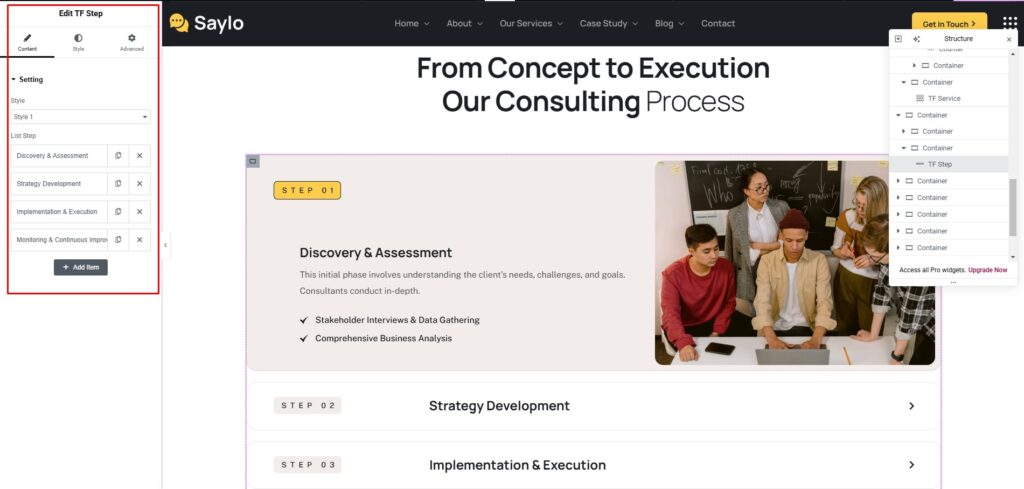
5.TF Step
- You build it at Themesflat Addons
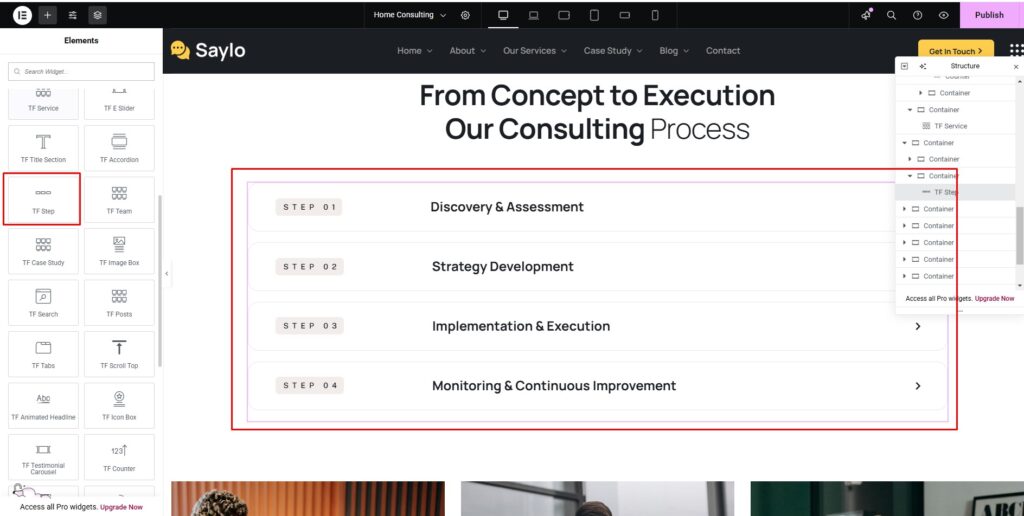
- You can customize at Content and Advanced
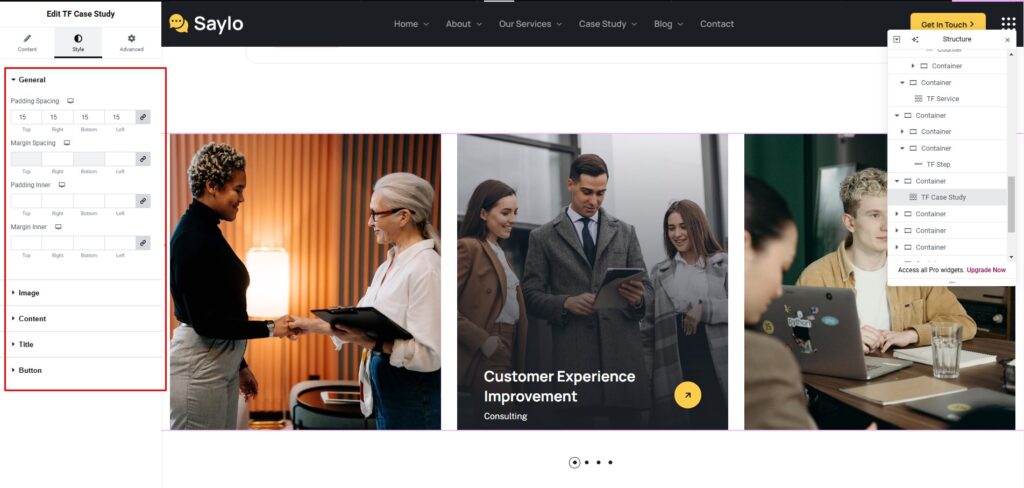
6.TF Case Study
- You build it at Themesflat Addons
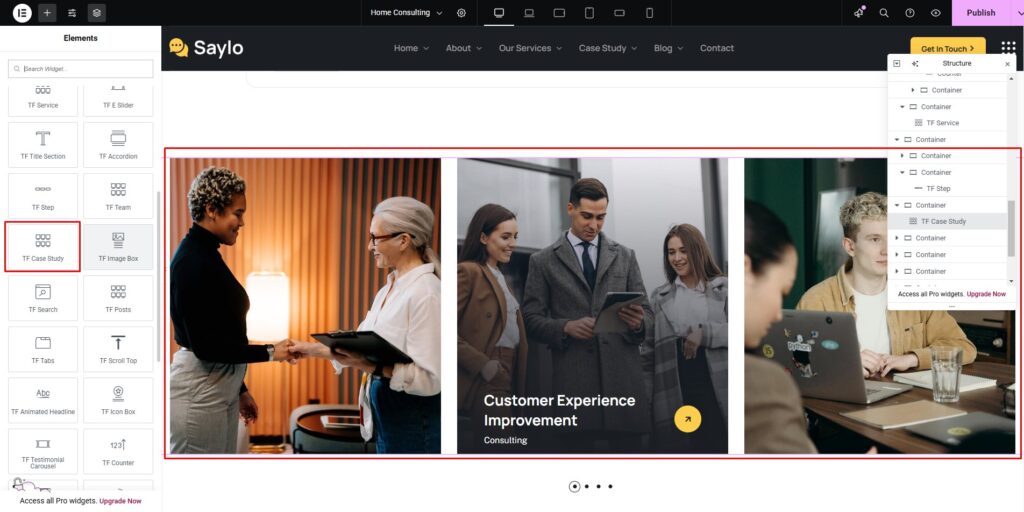
- You can customize at Content and Advanced
- There are many more widgets for you to choose, Everything is so simple when you just need drag and drop. Wish you have a great website!
We are Themesflat and we create premium, WordPress, Template Kits Addons for Elementor.
If you have any question please contact via email helpdeskthemesflat@gmail.com skypeid: helpdeskthemesflat
